This sea wall is the only wall that is not in my house and is also, my only outside mosaic wall, along with being the most complicated of my walls with its large variety of materials used. Tile, marble, rocks, semi-precious stones, stained glass, colored glass cabochons, and fossils from the cretaceous period are all used in this mosaic sea wall. Oh, and I must not forget seashells! A few of my found treasures were even surprises I stumbled upon accidently, which makes cherished stories about these special items used.
Phase 1: Initial Construction I started the sea wall in the summer after my son purchased his house. The sturdy stucco walls were perfect for securing the heavy stones. And of course, the swimming pool was life saving with the Texas heat and humidity. Privacy of the wall gave me the confidence I needed to feel that no one could see my mistakes, frustrations when I couldn’t figure something out, my slow progress, or my mess of unorganized and many piles of stones needed. For materials used for mosaic projects can look like rejected trash instead of valuable items. Also, the pool and the wall allowed me to wear what I needed to allow comfort and the soakings with the life saving water. Without the pool I know I would have worked even slower and I would have not been able to refresh my mind and body!
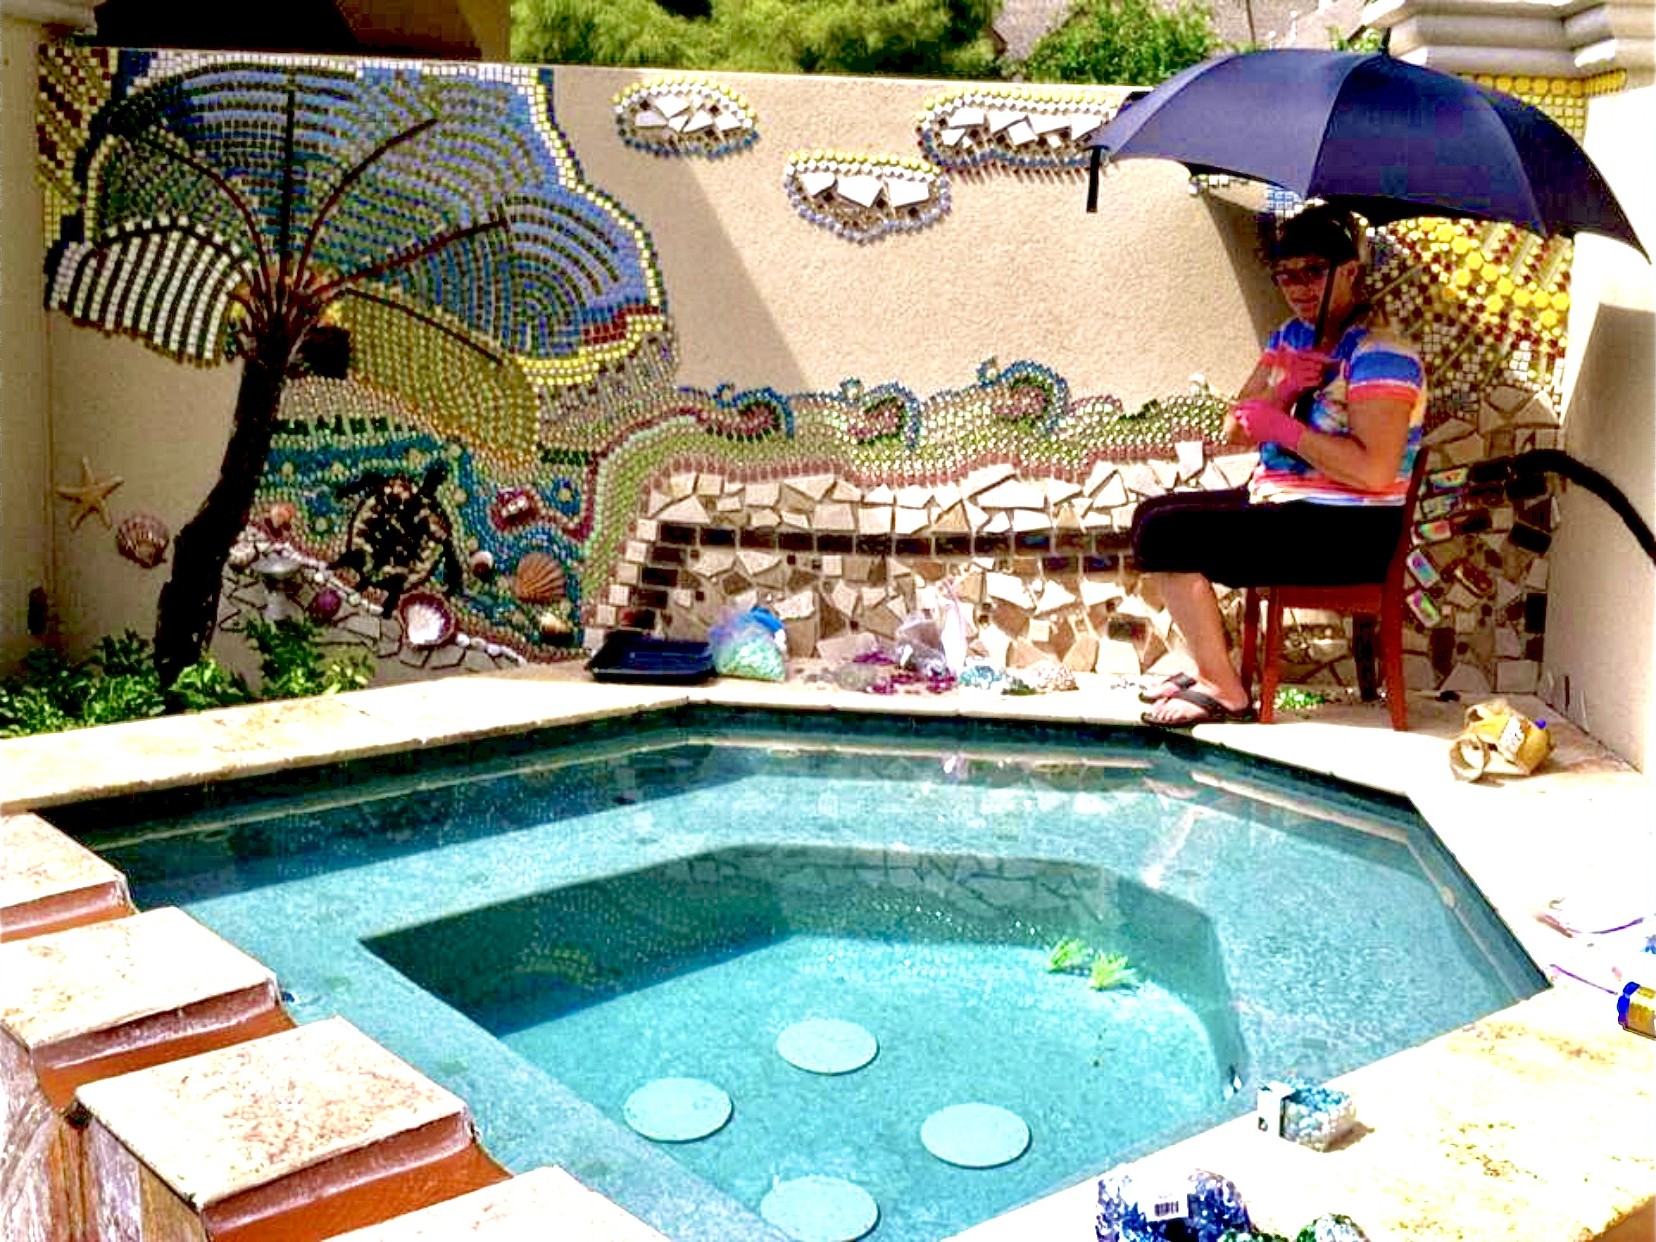
When my son asked for a sea theme and with his love for large aquariums I knew I could create something wonderful. The incentive for this first wall was a large piece of marble left over from the kitchen. As soon as I saw the color of this marble slab, I pictured a palm tree! I began with the tree trunk. Unlike most mosaic artist I never use a saw. Using only a hammer I break my tile or slab and let the random shapes inspire me and spark my ideas. Starting at the bottom of the first wall I stacked the slab pieces forming the trunk. As the pieces dried I could stack higher without bracing. The coconut rock was found on my farm. Tripping on this rock as I fed animals, I didn’t even know I needed this rock until I found it! When this happens, as I’m working, I feel as if a small miracle has occurred!
Placing the branches of the tree first and allowing the adhesive to dry, the rock could be held in place and then secured with duct tape until this pretend coconut dried firm. I then used small square tiles for the leaves of the palm tree. Liquid nails is the only adhesive I use to create the walls. The sea turtle was next and the easiest to create because of the shape of rocks used to create this beloved creature. Placing sea shells took very little time and a wide variety of shapes made this part very easy and fast to create. Filling the background with colorful round stones called, cabochons, gives the sensation of water moving! I wanted to give an appearance of being on a cliff looking down from a wall and loved the rectangular iridescent tile found online, used to create this appearance.
Lastly, clouds, the sun, waves, and wind were used to add more color, movement, and variety. In a mosaic changing the pattern creates interest and surprise. Changing the pattern is also a way to create a feeling of movement.

In estimating how far stones will go on a wall, I call this “guesstimation”! Sometimes running out of an item makes you think of a different idea or color. But this is what makes mosaics so interesting, when a change occurs, it creates variety and interest. The best part of working on the wall was being at my son’s house to see him and his family. Many nights I stayed over night due to a long drive home. A couple of times I even stayed a week or more.
One aspect that is frustrating about mosaics is the time involved. One stone at a time takes many months, and there are days where my imagination is stuck, or a different item is needed and I have to search for something new to use! Also, the work is hard on your hands and there are days you have to stop so your hands can rest and heal. This first wall took a whole summer and part of fall to complete.
Finally, finished with the first wall, it would take a whole year before I started the second wall. This was actually a good thing because I needed to find inspiration for the next wall so that it matched, yet was different!
Phase 2: Grout
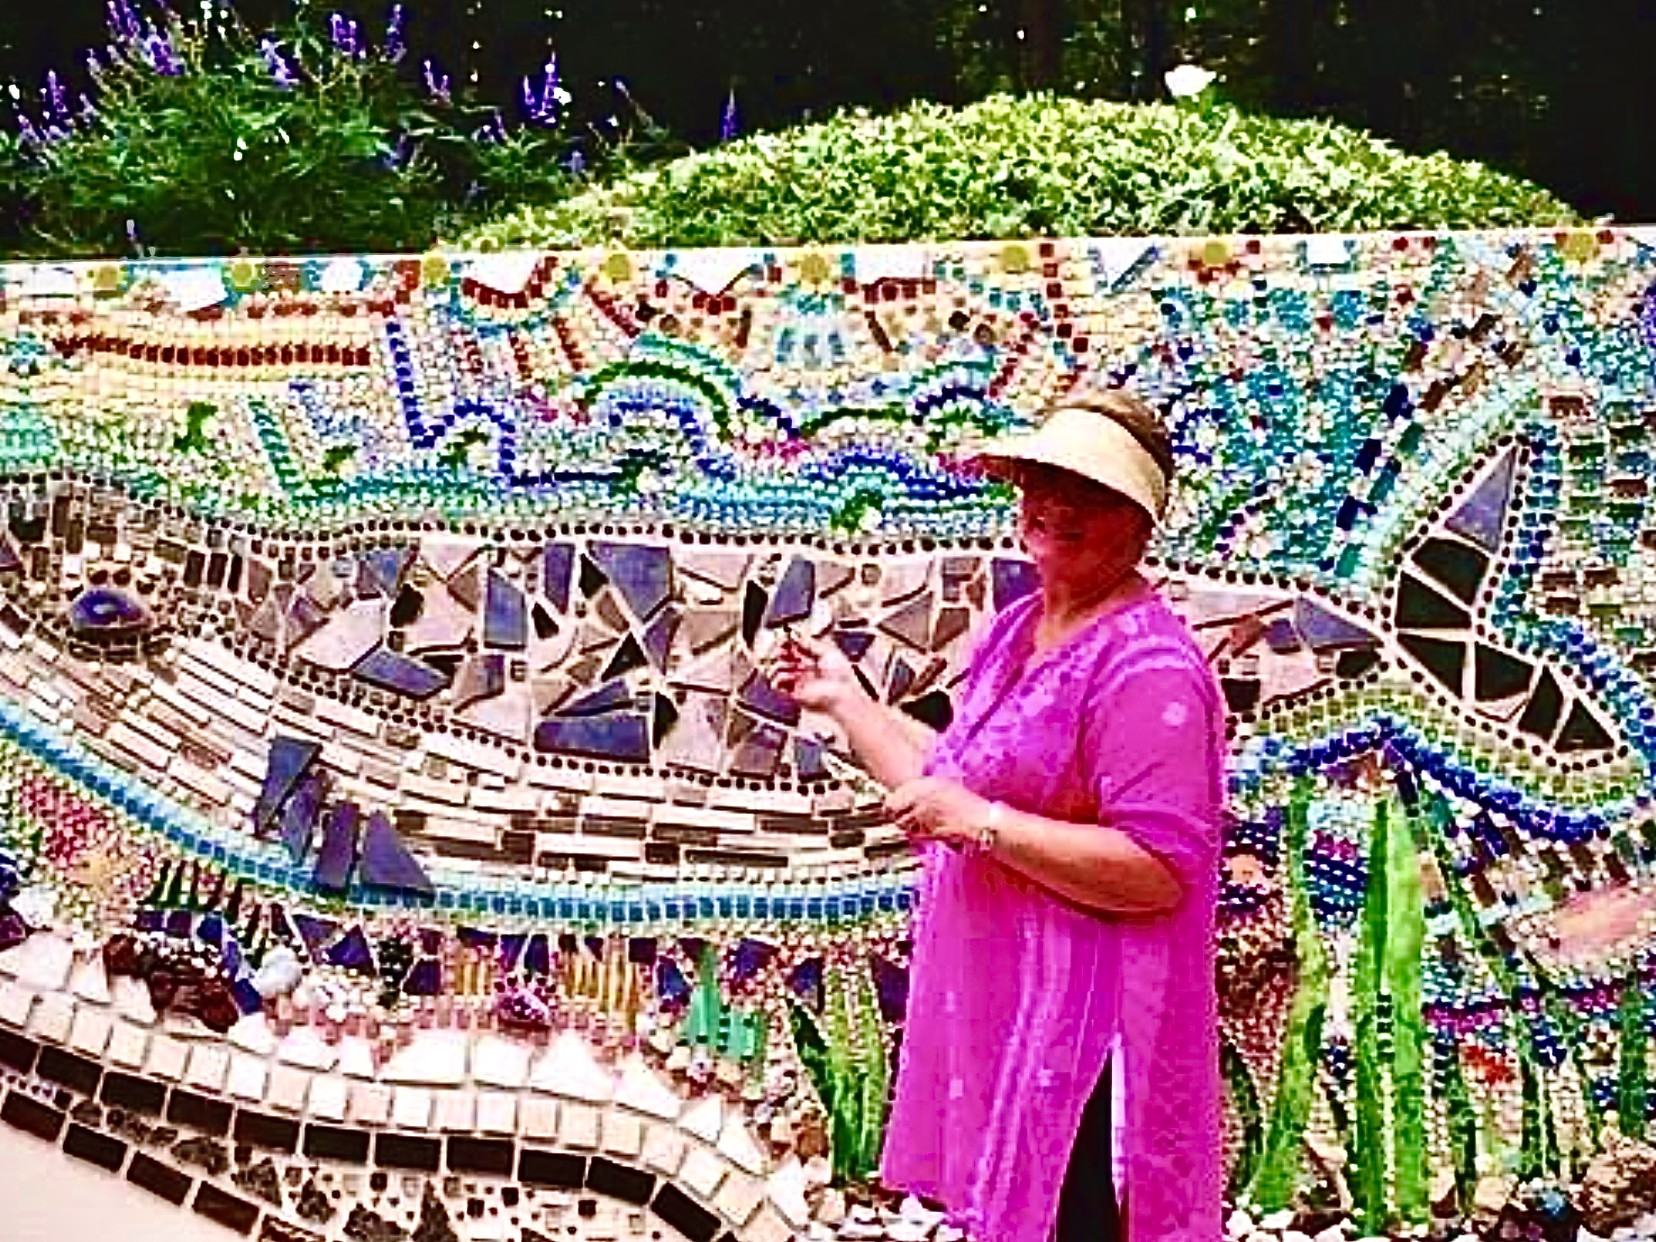
After all the stones are in place, the mosaic is only half finished. Below, you can see two examples of what things look like before the grout is filled in and how the art will look afterwards. The grout is a very important step for any mosaic. It is actually what holds everything together. Through all kinds of weather a mosaic will last, forever. A mosaic wall or art of any kind is a legacy to leave, long after you are gone. Mosaics are one of the oldest art forms and there are many techniques used to make mosaics.
Sometimes, though people are disappointed after the grout is applied. The main reason for disappointment is due to the fact some stones will be smaller, as the grout fills in the voids, it also has to hold onto some of the stones. This grasping of stones is important and spacing of the stones needs to be consistent to hold the grout. Experience is you best tool here. You will learn what works best and what you like best in the art of grouting. I usually grout as I go, for it gives people an idea of the finished art, and lets me see if I’m getting the results I need. But, rest assured, your mosaic will last a lifetime and beyond, after grouting. You can experience the wall before and after the grout is applied by moving the bar below.
Phase 3: Finished At Last!
After two years, the walls are finished! I never consider the time involved or how long my walls are taking. It doesn’t matter because I want to do them. I am happiest when I am building them and I’m constantly looking for treasures to put on them. I always have so much to catch up on after I am finished with a wall, but I want to do them anyway! The satisfaction of finishing out weighs the time lost!
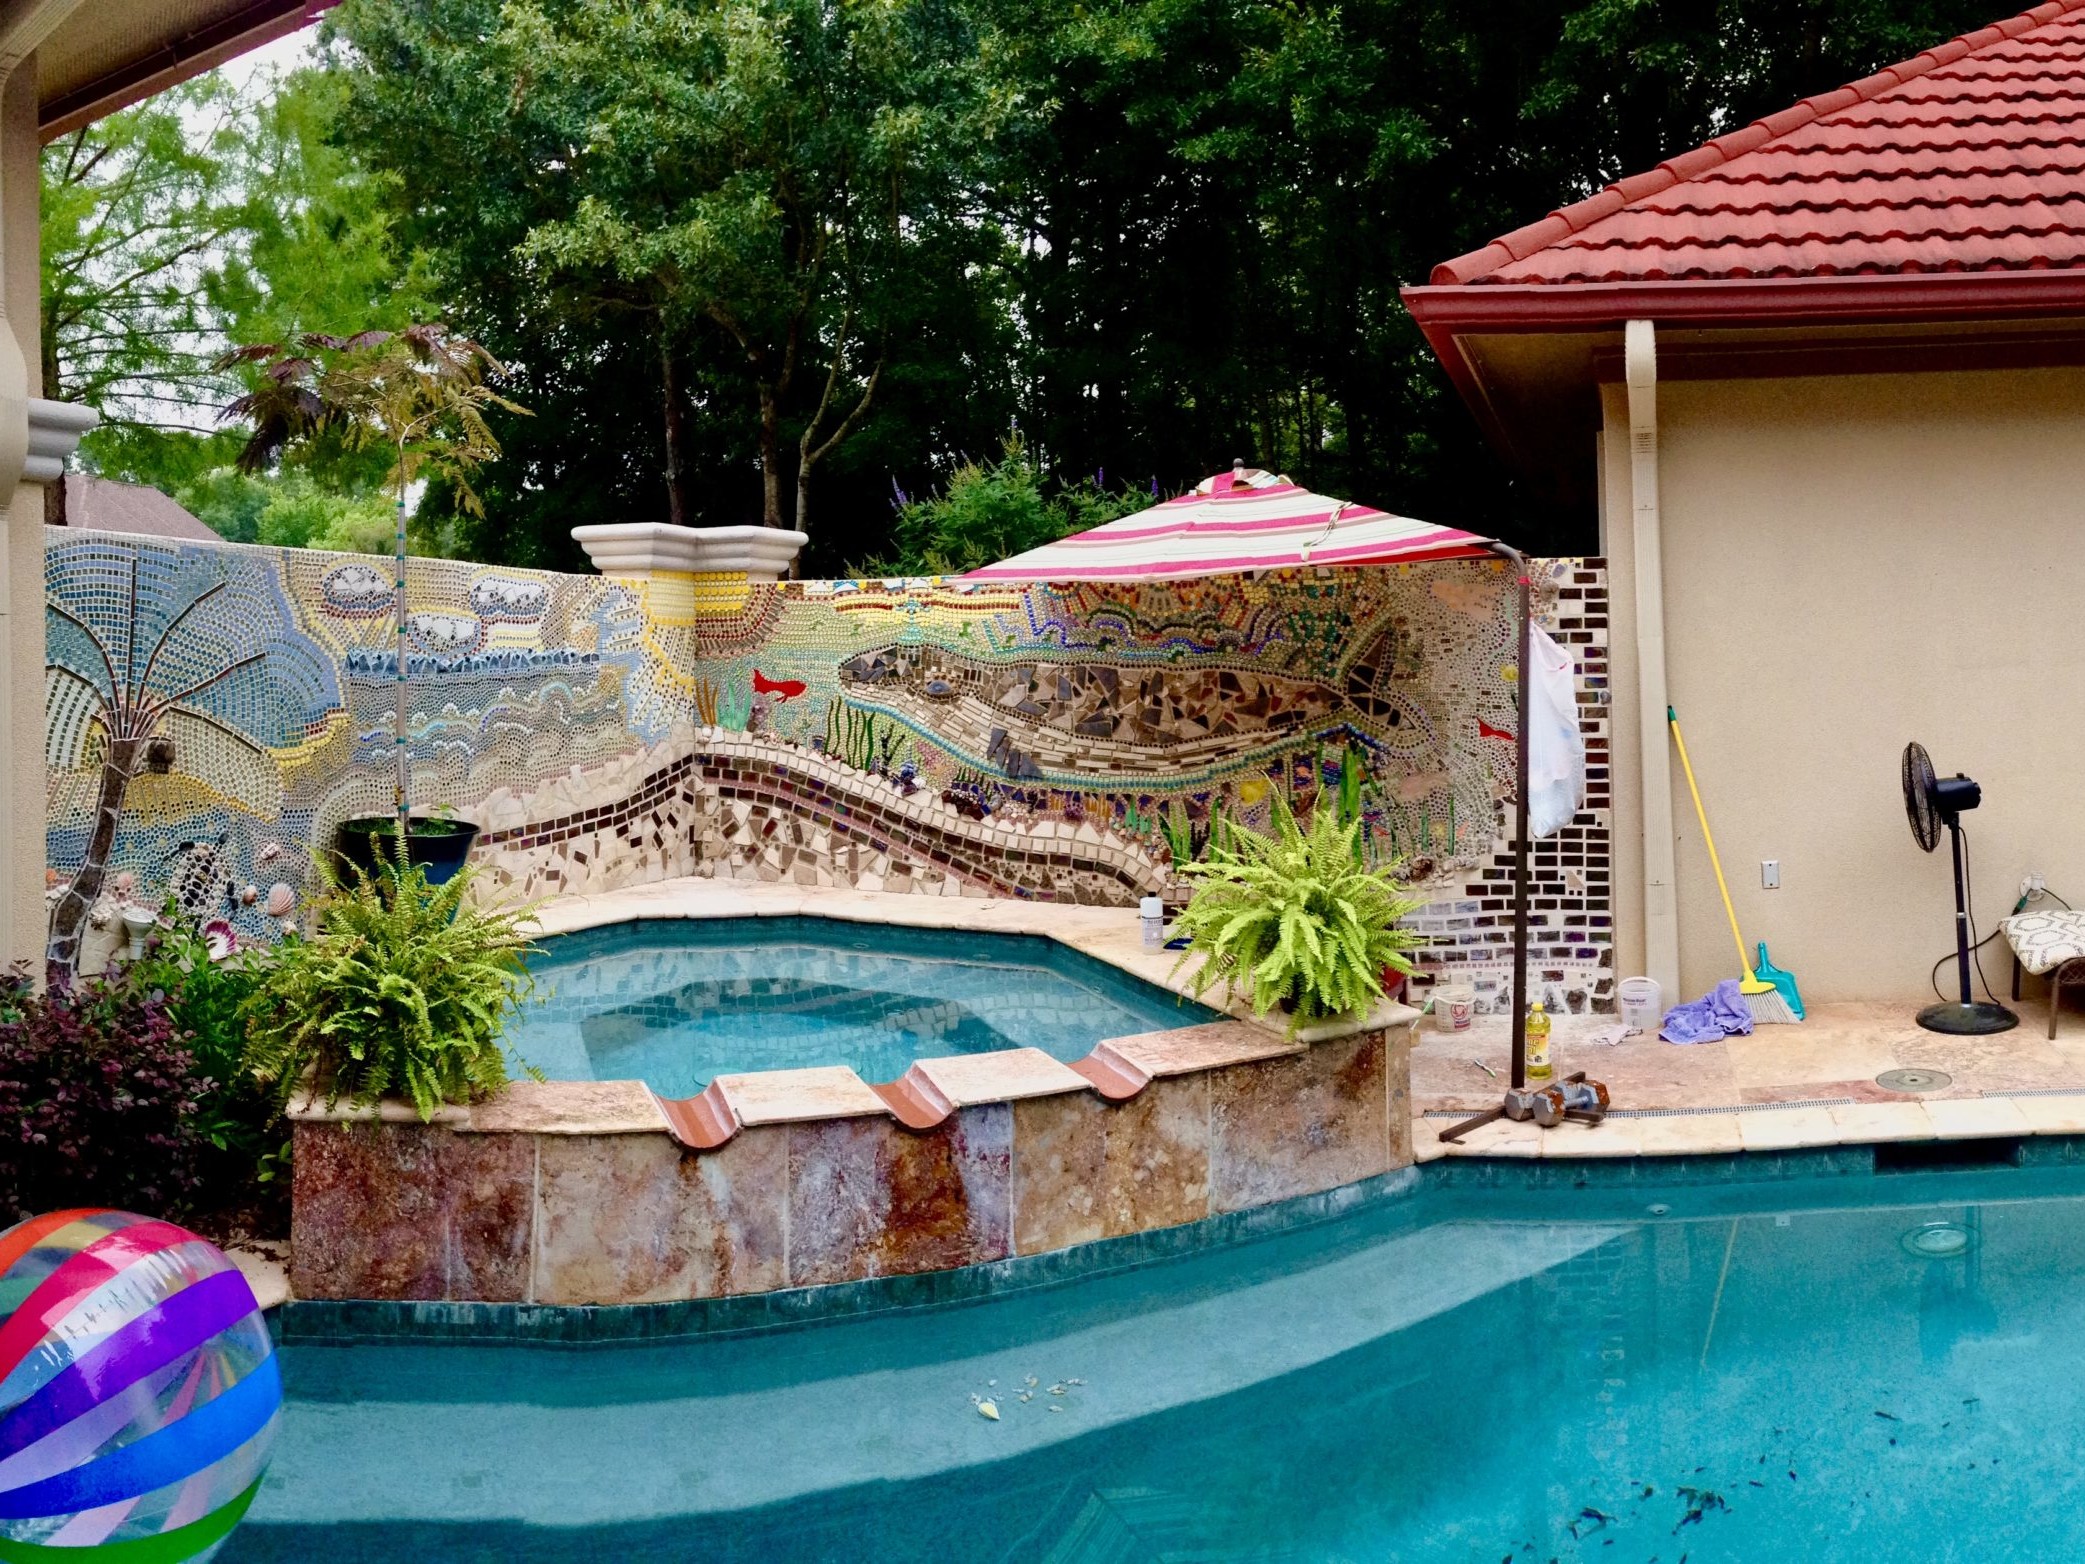
With all that out of the way, let me show you my seawall mosaic!
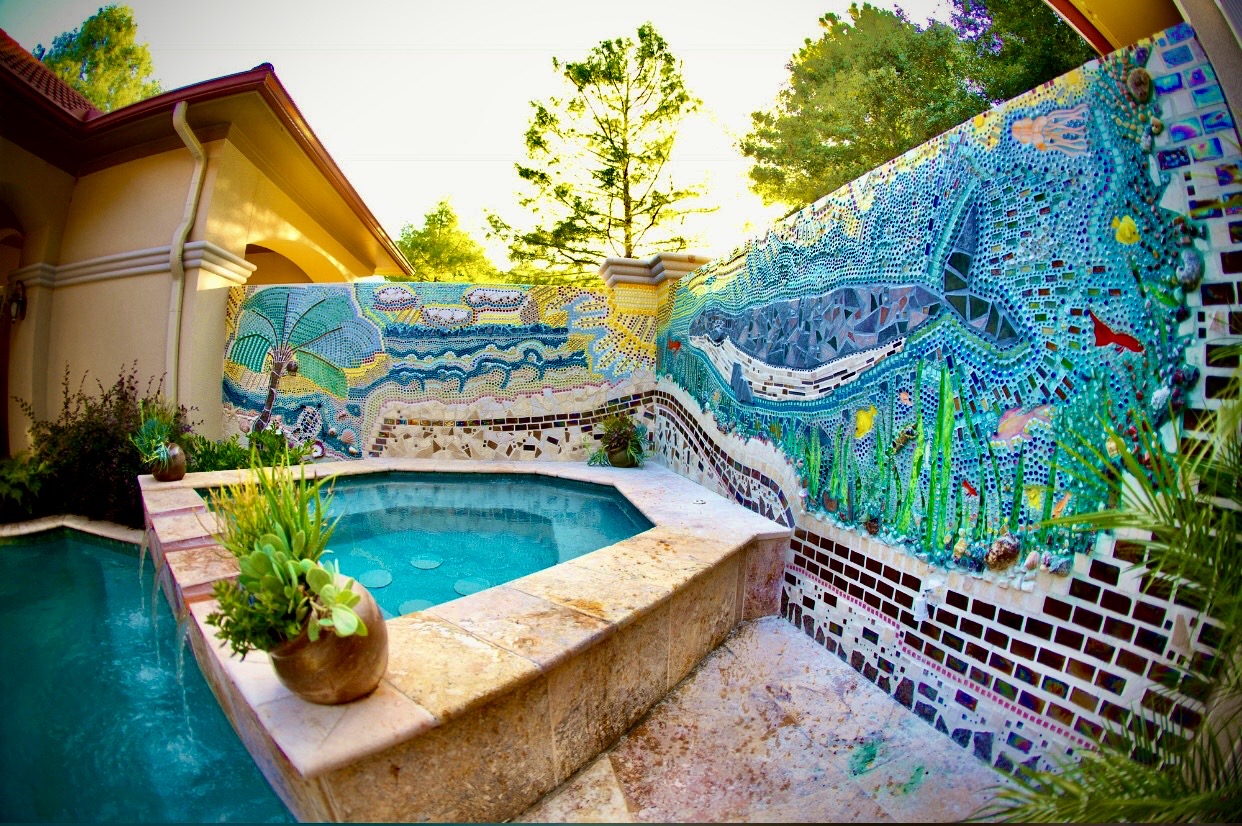
One of the things that fascinates most people is all the different distinct elements that make up the many different scenes of the sea wall. I would like to tell why these scenes are so special.
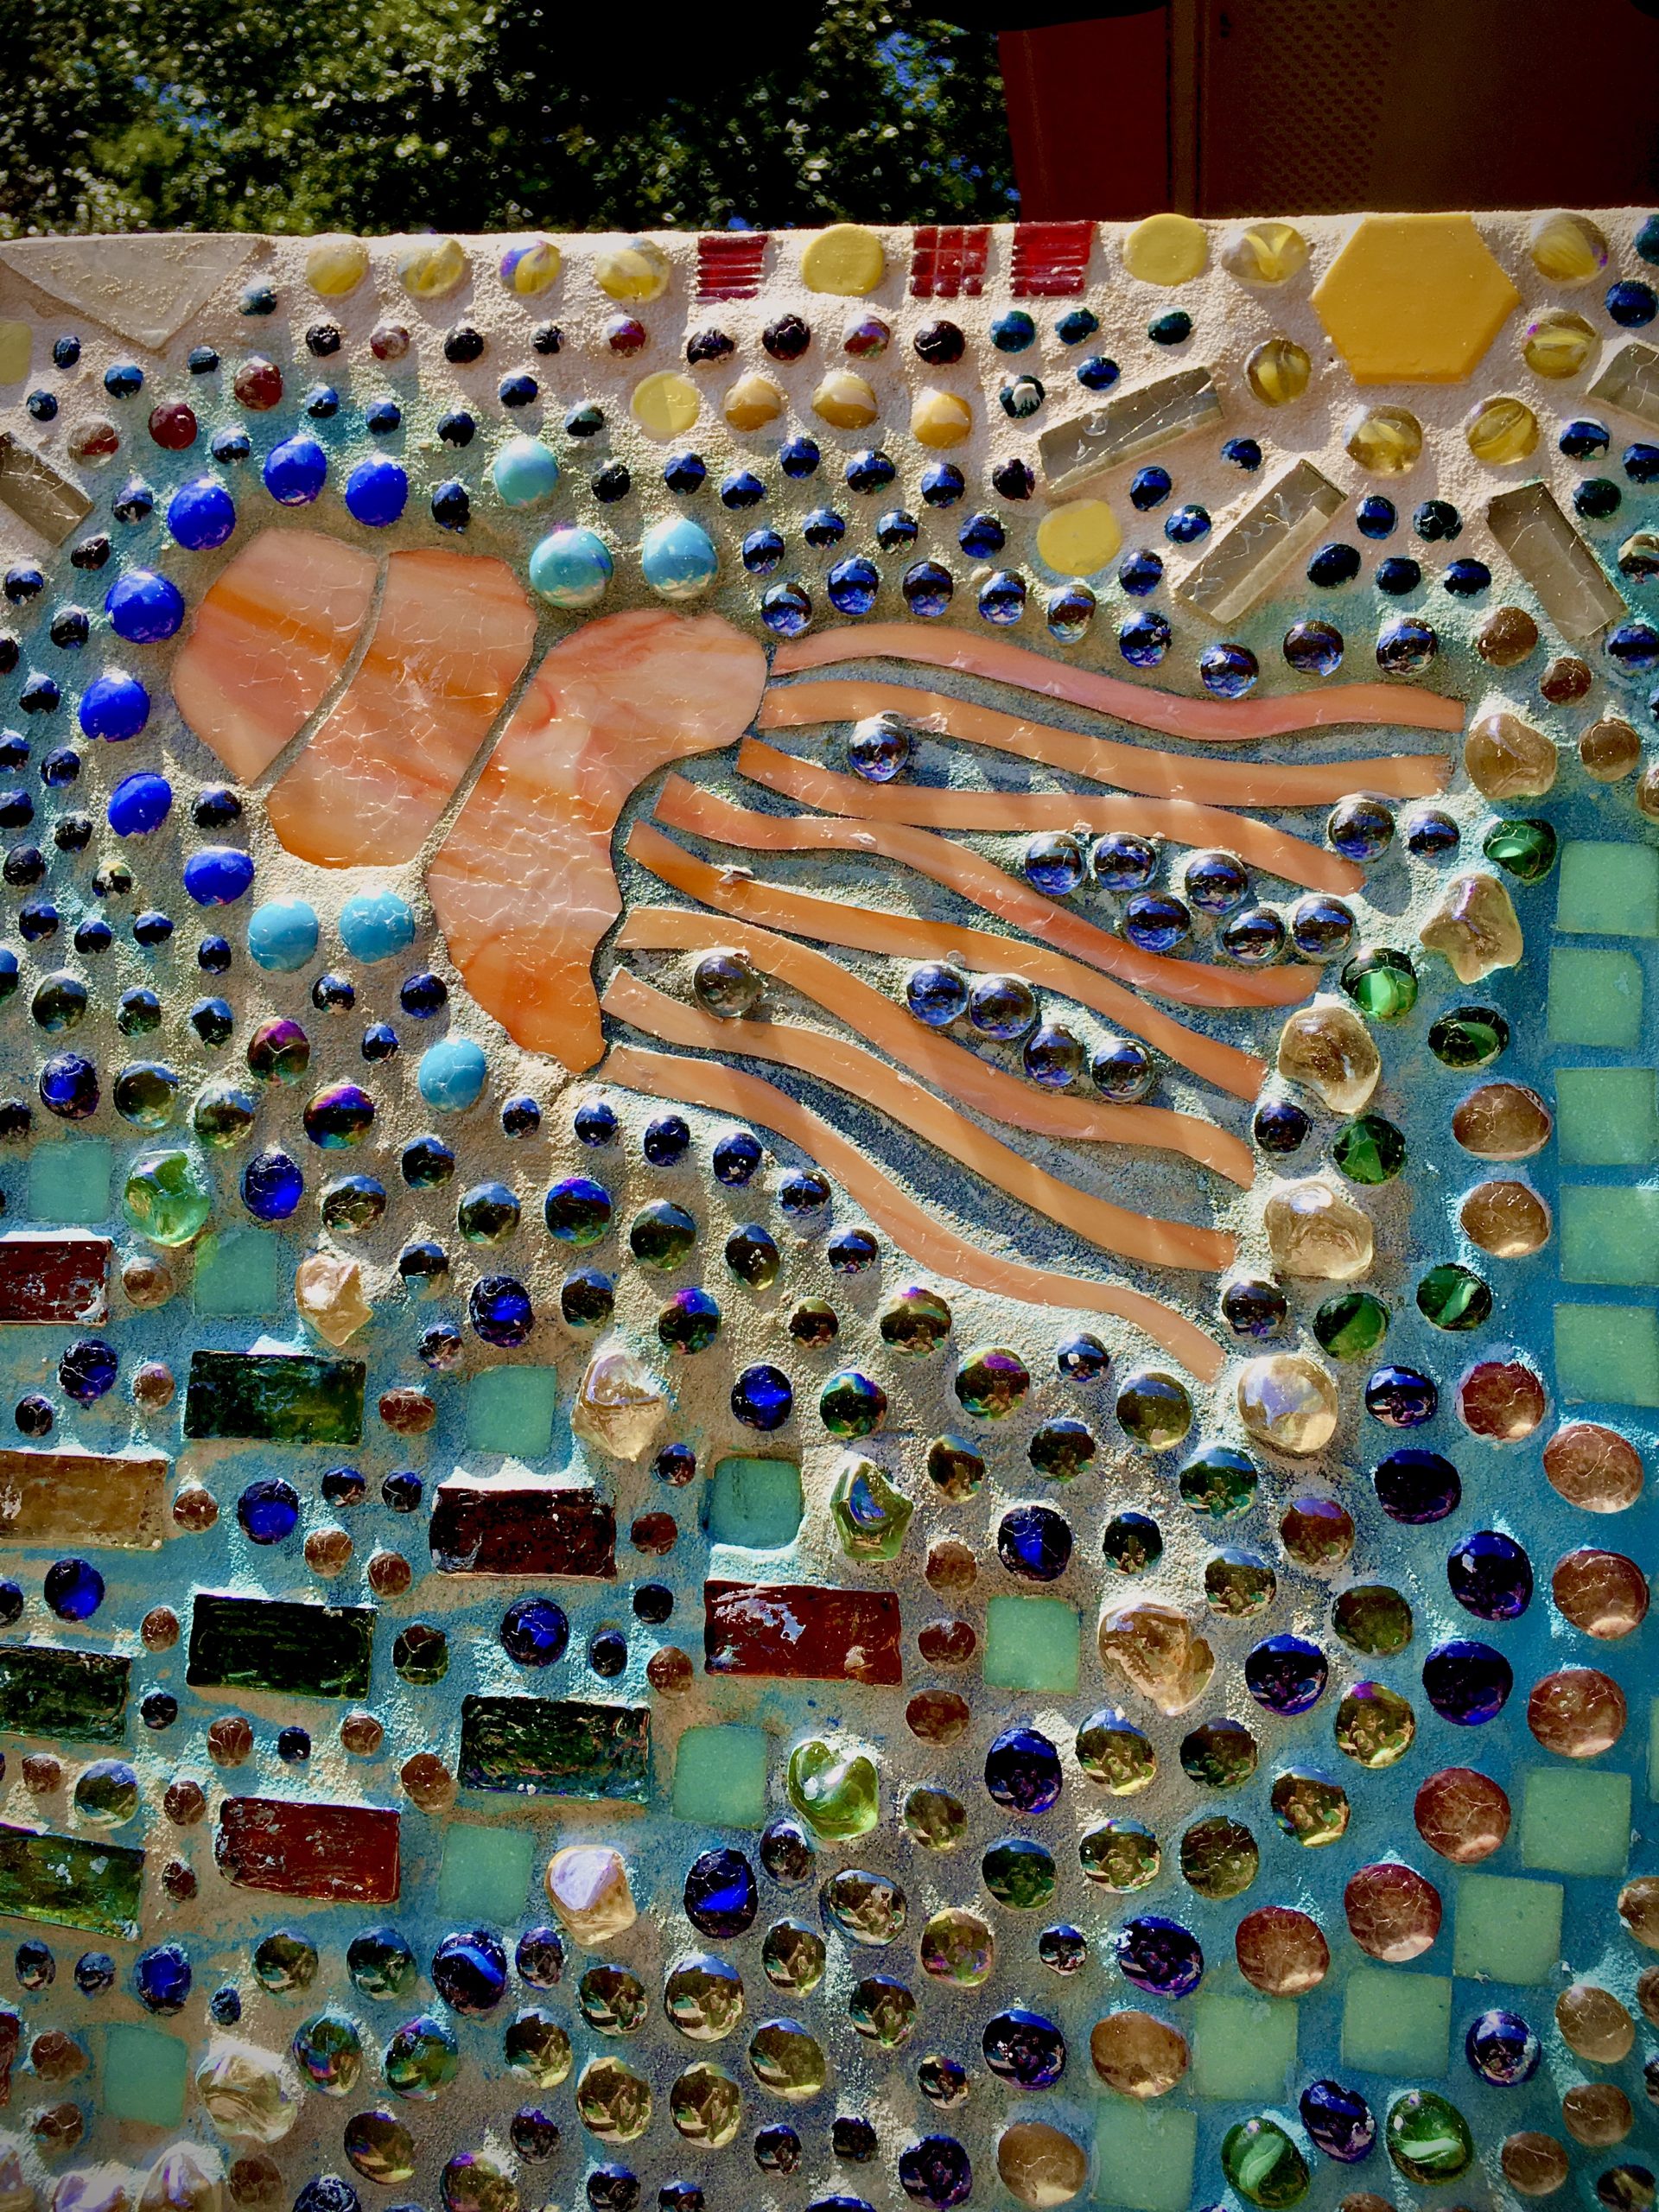
The Jellyfish
This Jellyfish is orange because of his strength and endurance. Using his frail body, he squeezes from the bottom to push jets of water that propel him through the water. Coping like this jellyfish is what we need to do to make it through the stifling East Texas weather. For the humidity here honestly feels like you are walking or even when you are only sitting, in the hottest shower.
Because there is such high humidity you are convinced there must be an ocean close by. But not in East Texas, instead there are big beautiful full trees with many lakes and rivers.
His orange color is important for it is know that orange is well known for delivering endurance, fascination, happiness, creativity, determination, attraction, success, encouragement, and stimulation. How remarkable are the jellyfish and the color orange?
(Swipe for more…)
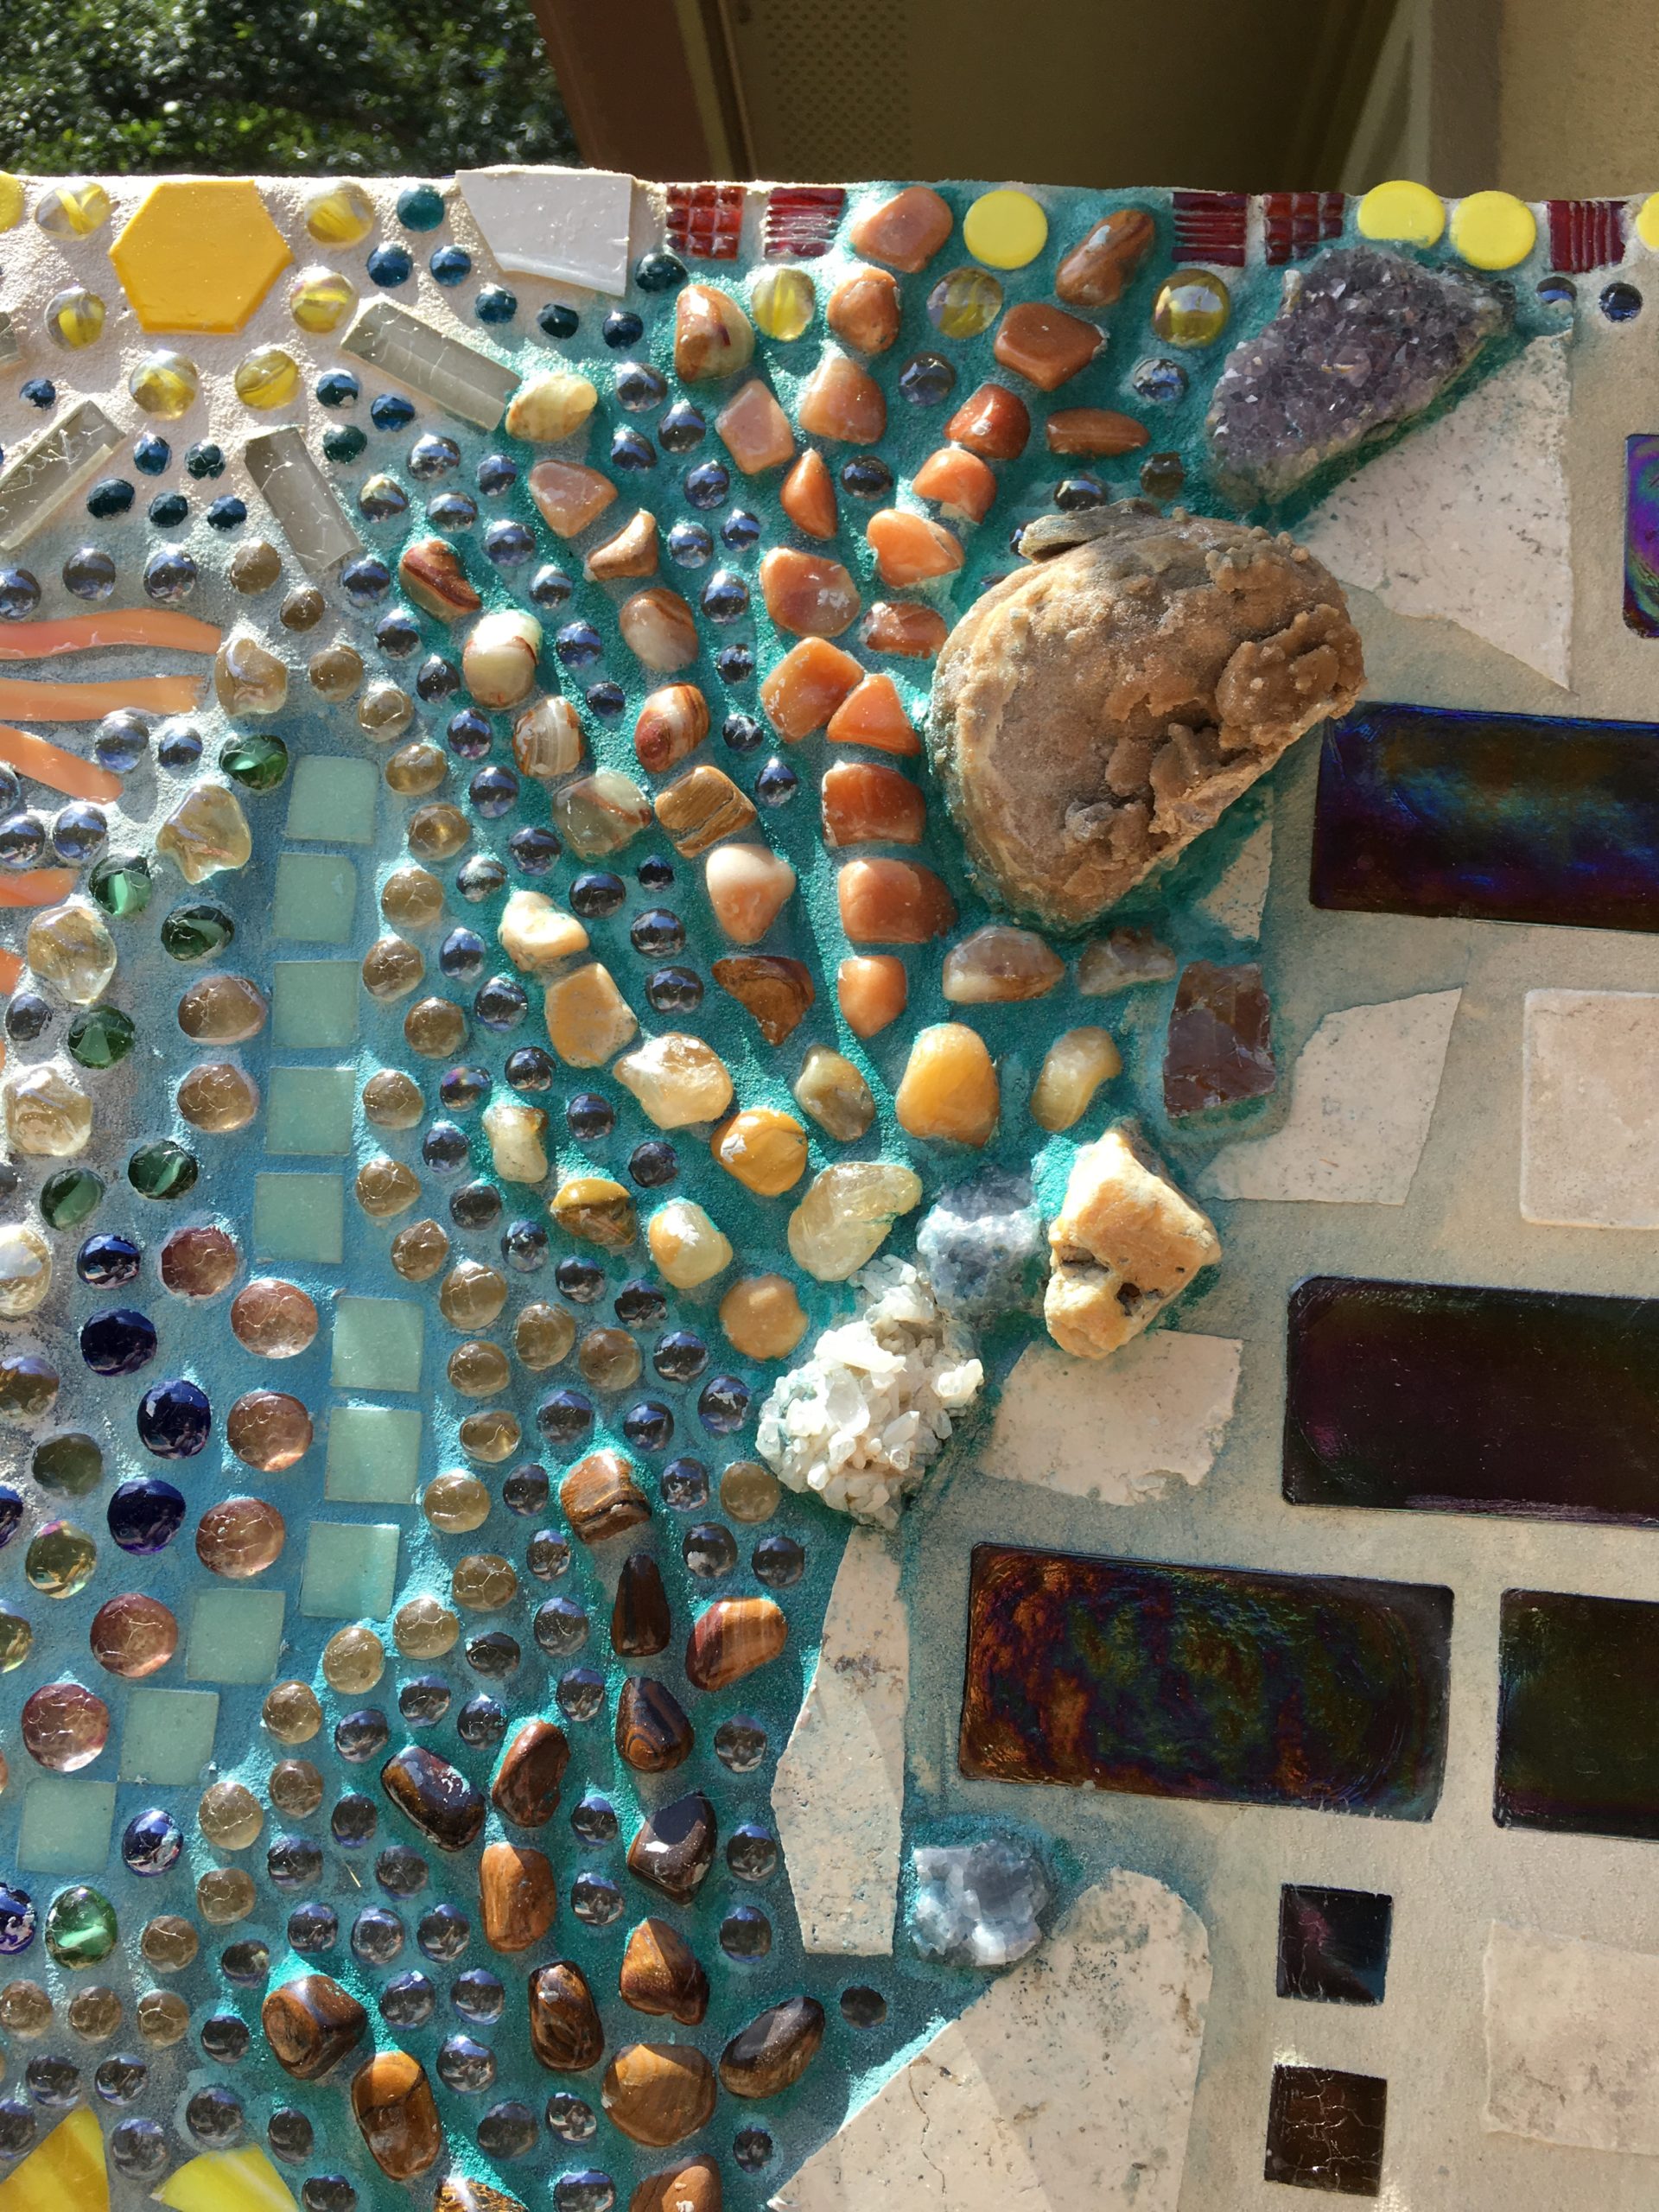
Fossils, Stones, and Crystals
Cornelian Stones are also an orange color and have great properties of importance. A stabilizing stone, Carnelian restores vitality and motivation, and simulates creativity. It gives courage, promotes positive life choices, dispels apathy, and motivates for success. The amethyst crystal is purple and is said to provide emotional support in the form of confidence and calmness. This stone induces protection from the negativity of stress and anxiety. Amethyst is a natural tranquilizer, alleviating sadness and grief. It is known for its healing properties with activating spiritual awareness.
My most favorite in this corner is the fossilized crystal shell from the cretaceous period. Its meaning is to or denoting the last period of the Mesozoic era, between the Jurassic and Tertiary periods. We found this fossil at the North Sulphur River.
My husband’s favorite rocks are “face” rocks. he found this face rock that looks like the character Groot! Do you agree with him? My son agrees.
(Swipe for more…)
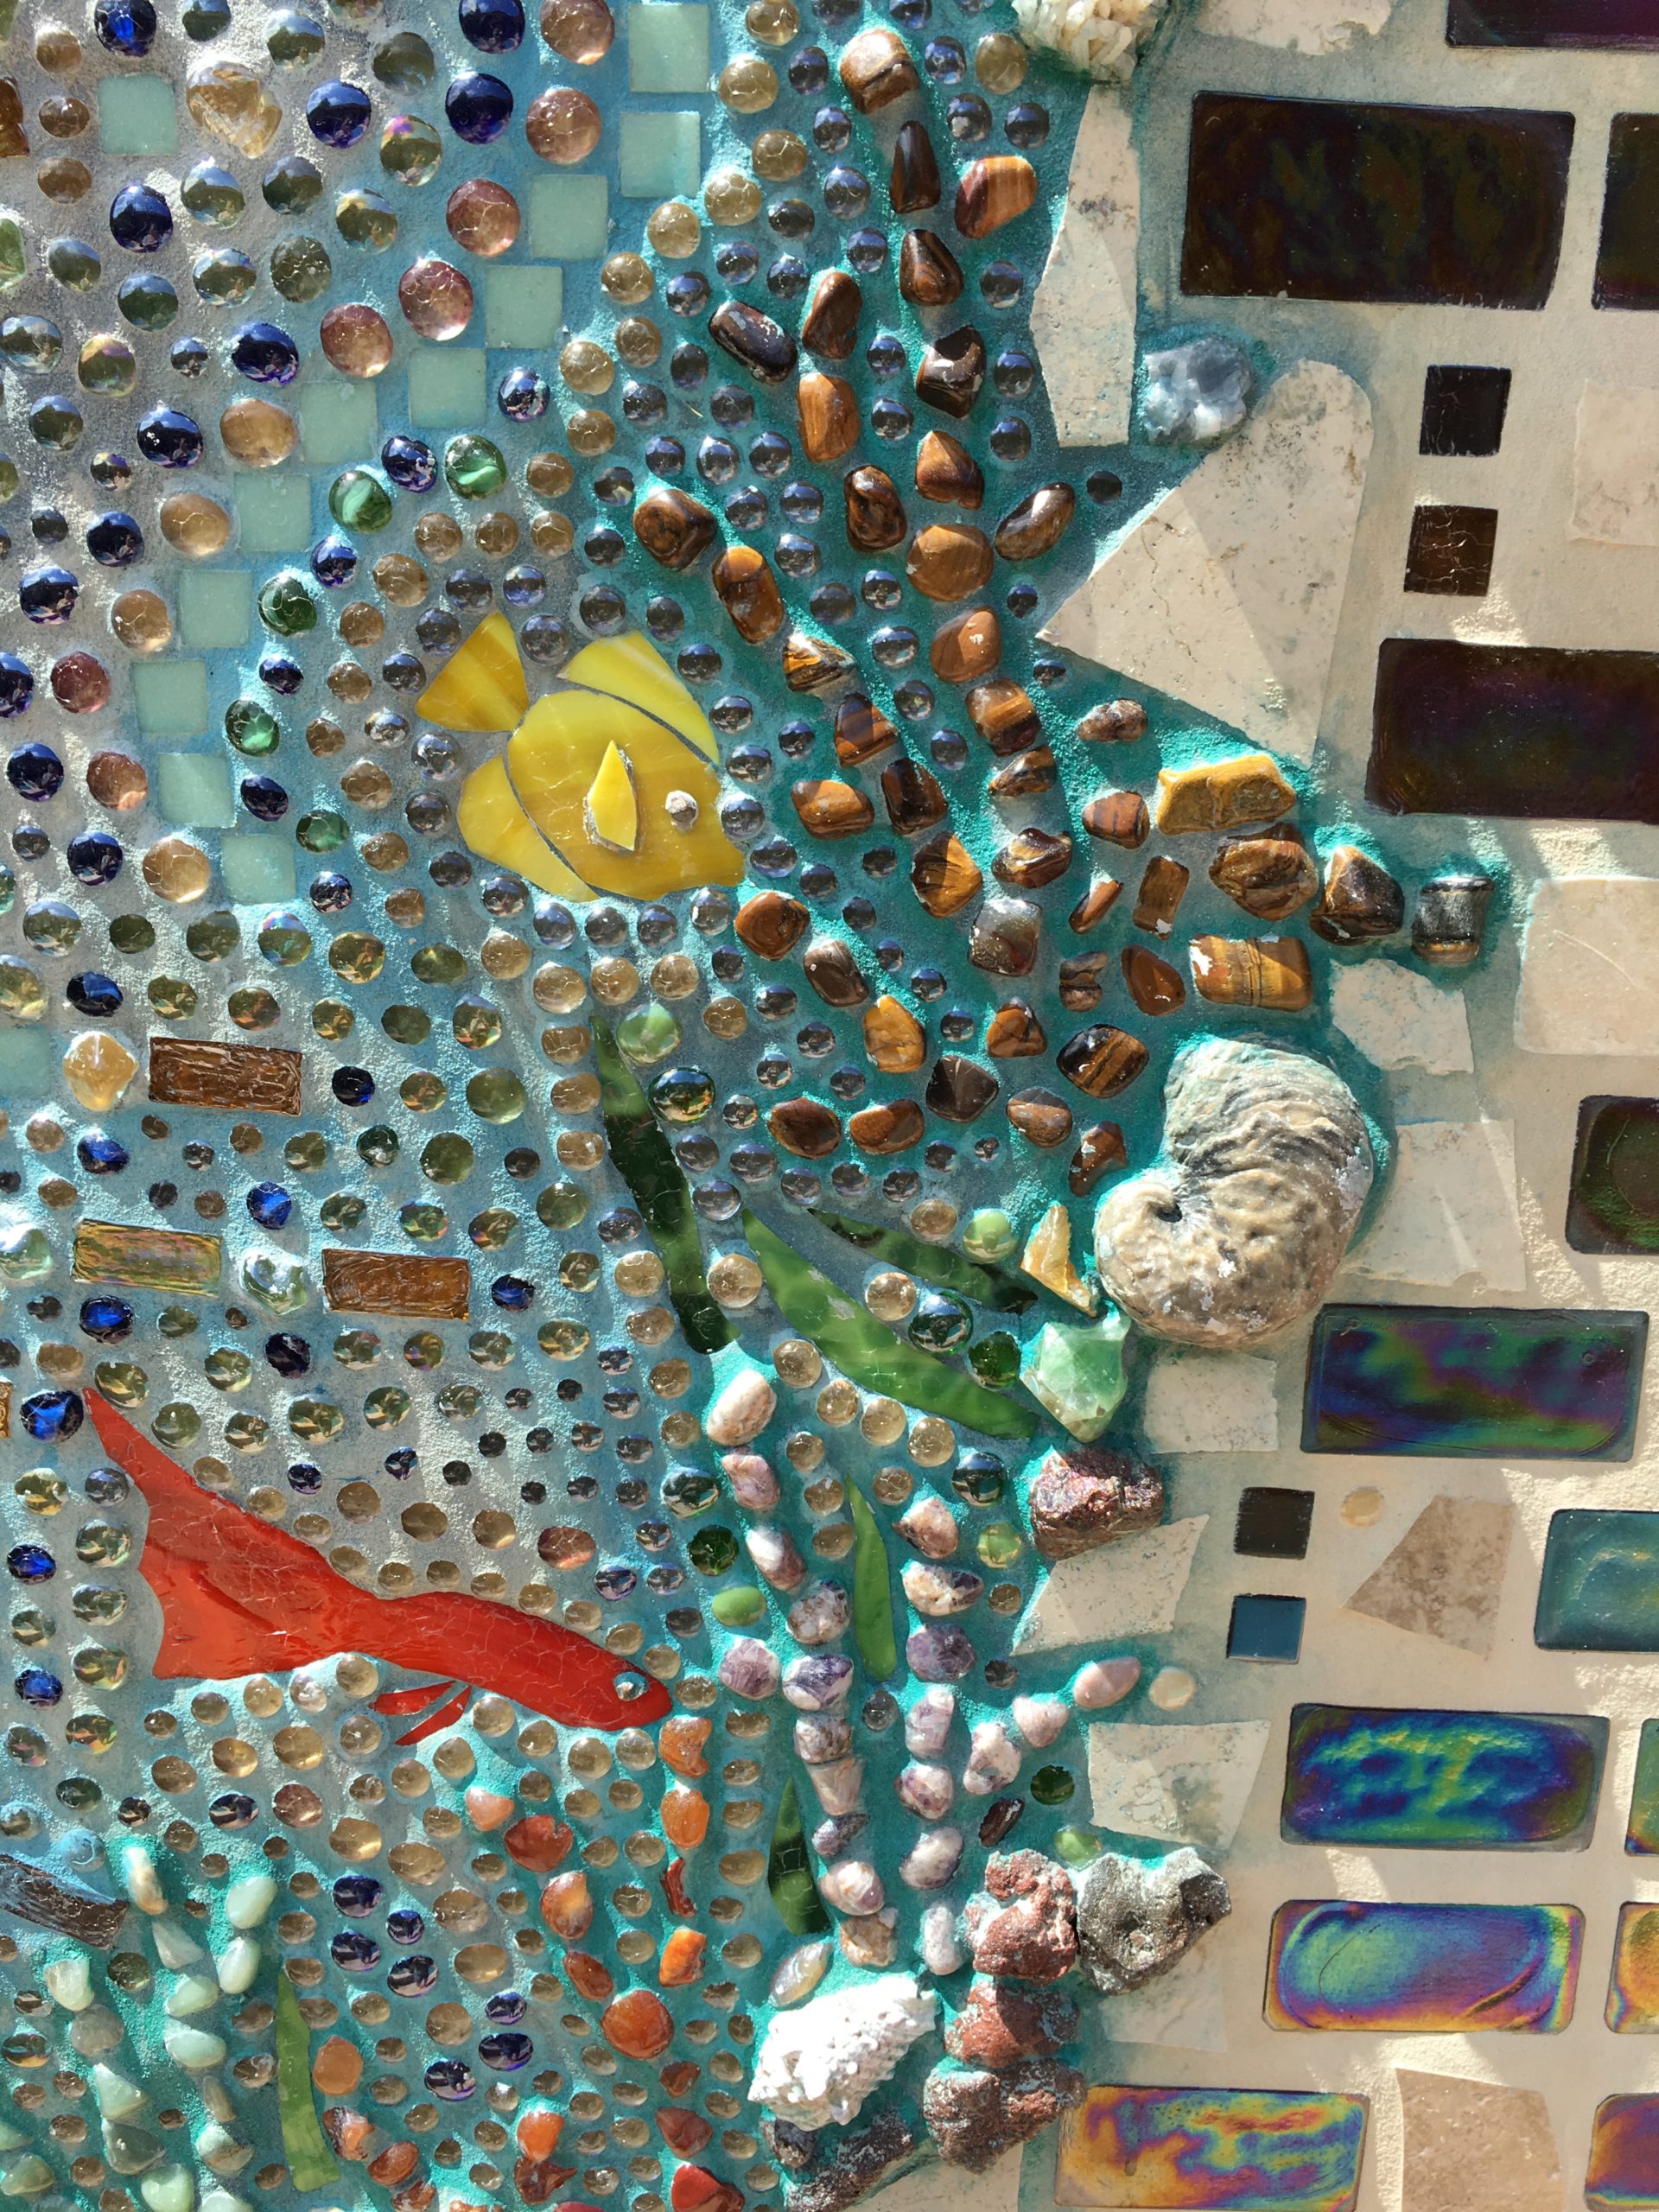
Stain Glass Fish
These two stain glass fish were cut by hand using a glass cutter. I had taken a glass cutting glass 42 years before crafting these fish. I chose simple fish that were easy to cut. Using sections of their bodies I was able to easily cut the sections and piece them together. The divided sections, I think actually add to these fish, giving more dimension.
Tiger eye polished stones are placed to look like coral with the fish feeding on these plants. Tiger eyes are actually crystal rocks with lovely bands of color running thru them. They are power stones that help to release fear and aids in harmony. Tiger eyes stimulate action and helps to make decisions with discernment and unclouded emotions.
The large shell is another fossil from the cretaceous period found at the North Sulphur River. We went every weekend for almost a year to find our fossils.
(Swipe for more…)

The Tiny Turtle
A creek was behind my son’s house. When I saw this round green stone I wanted to make a turtle but had no legs, tail, or head. My young granddaughters were eager to look for tiny stones to make the turtle. Going to the creek they found the perfect tiny stones. These precious girls were only 6 and 8 years of age at the time.
Working with them made this wall that much more special for me.
The polished rocks with black specks are called dalmatian jasper. This stone is known to have qualities that create childlike joy and helps to remove barriers preventing you from moving forward. It helps to promote your faith.
The largest rock at the very bottom of the picture was found at Lake Texoma. It looks to have plant impressions in the rock, adding to my mosaic looking like a real ocean floor.
(Swipe for more…)
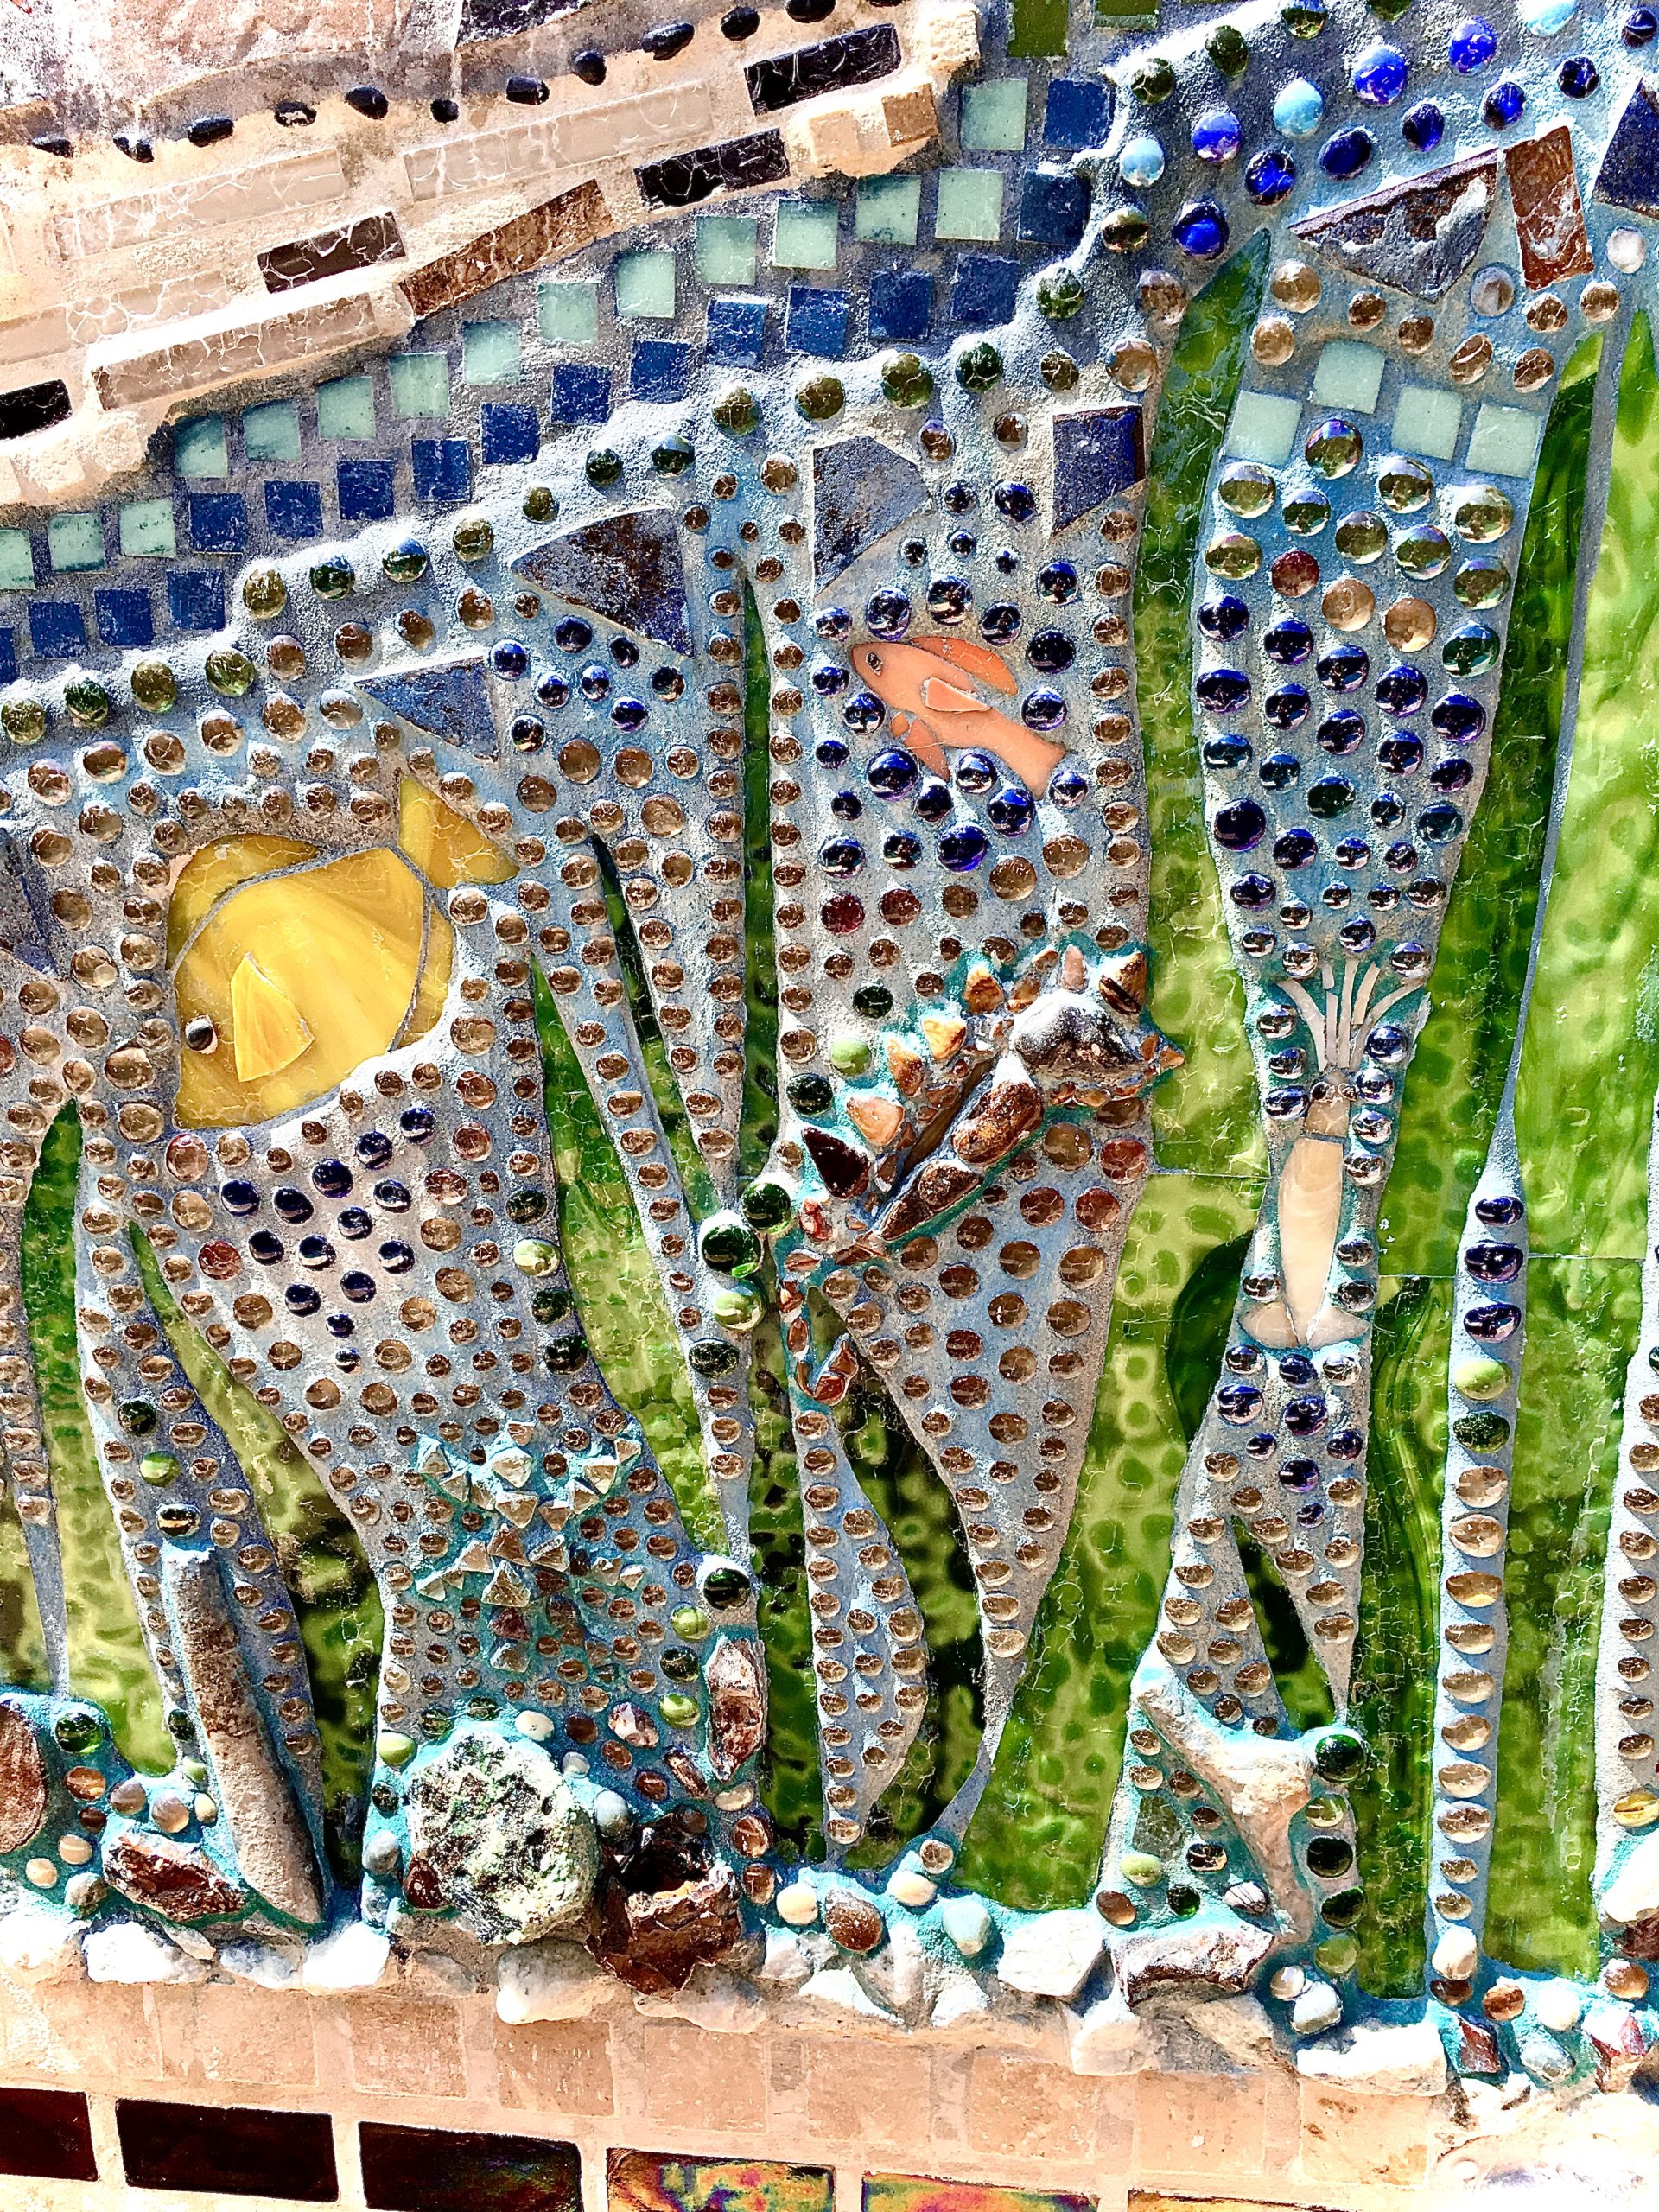
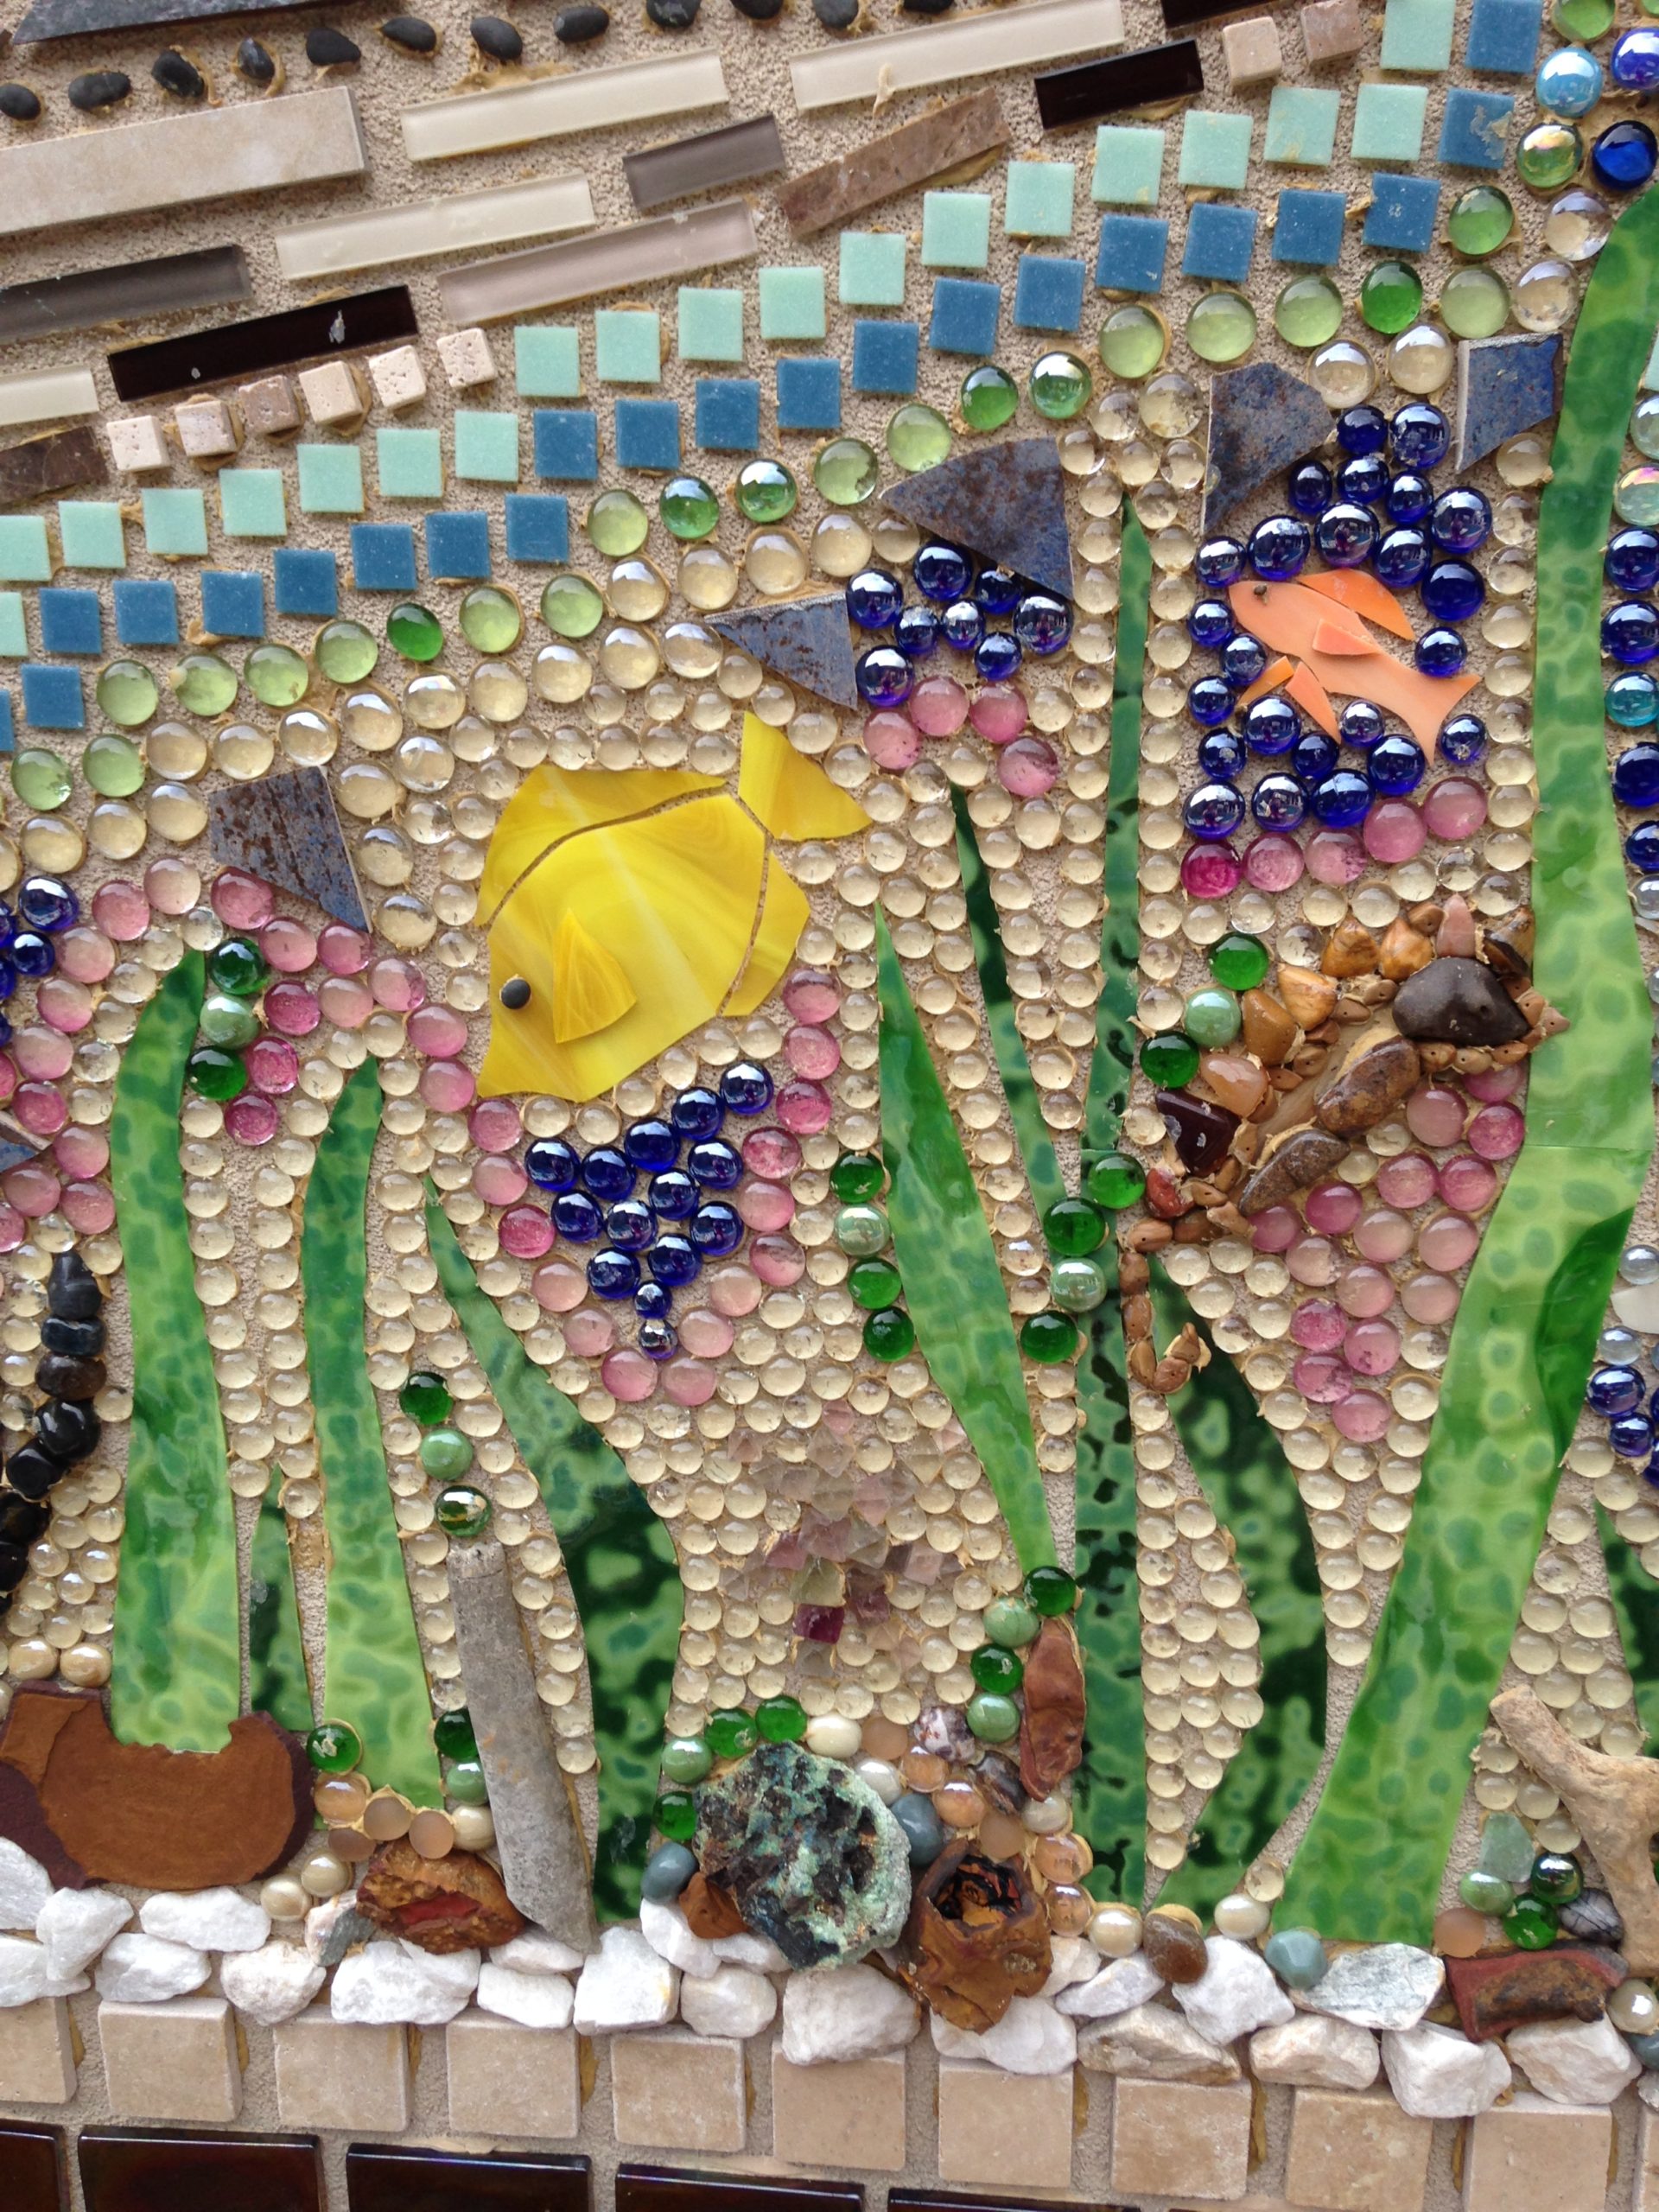
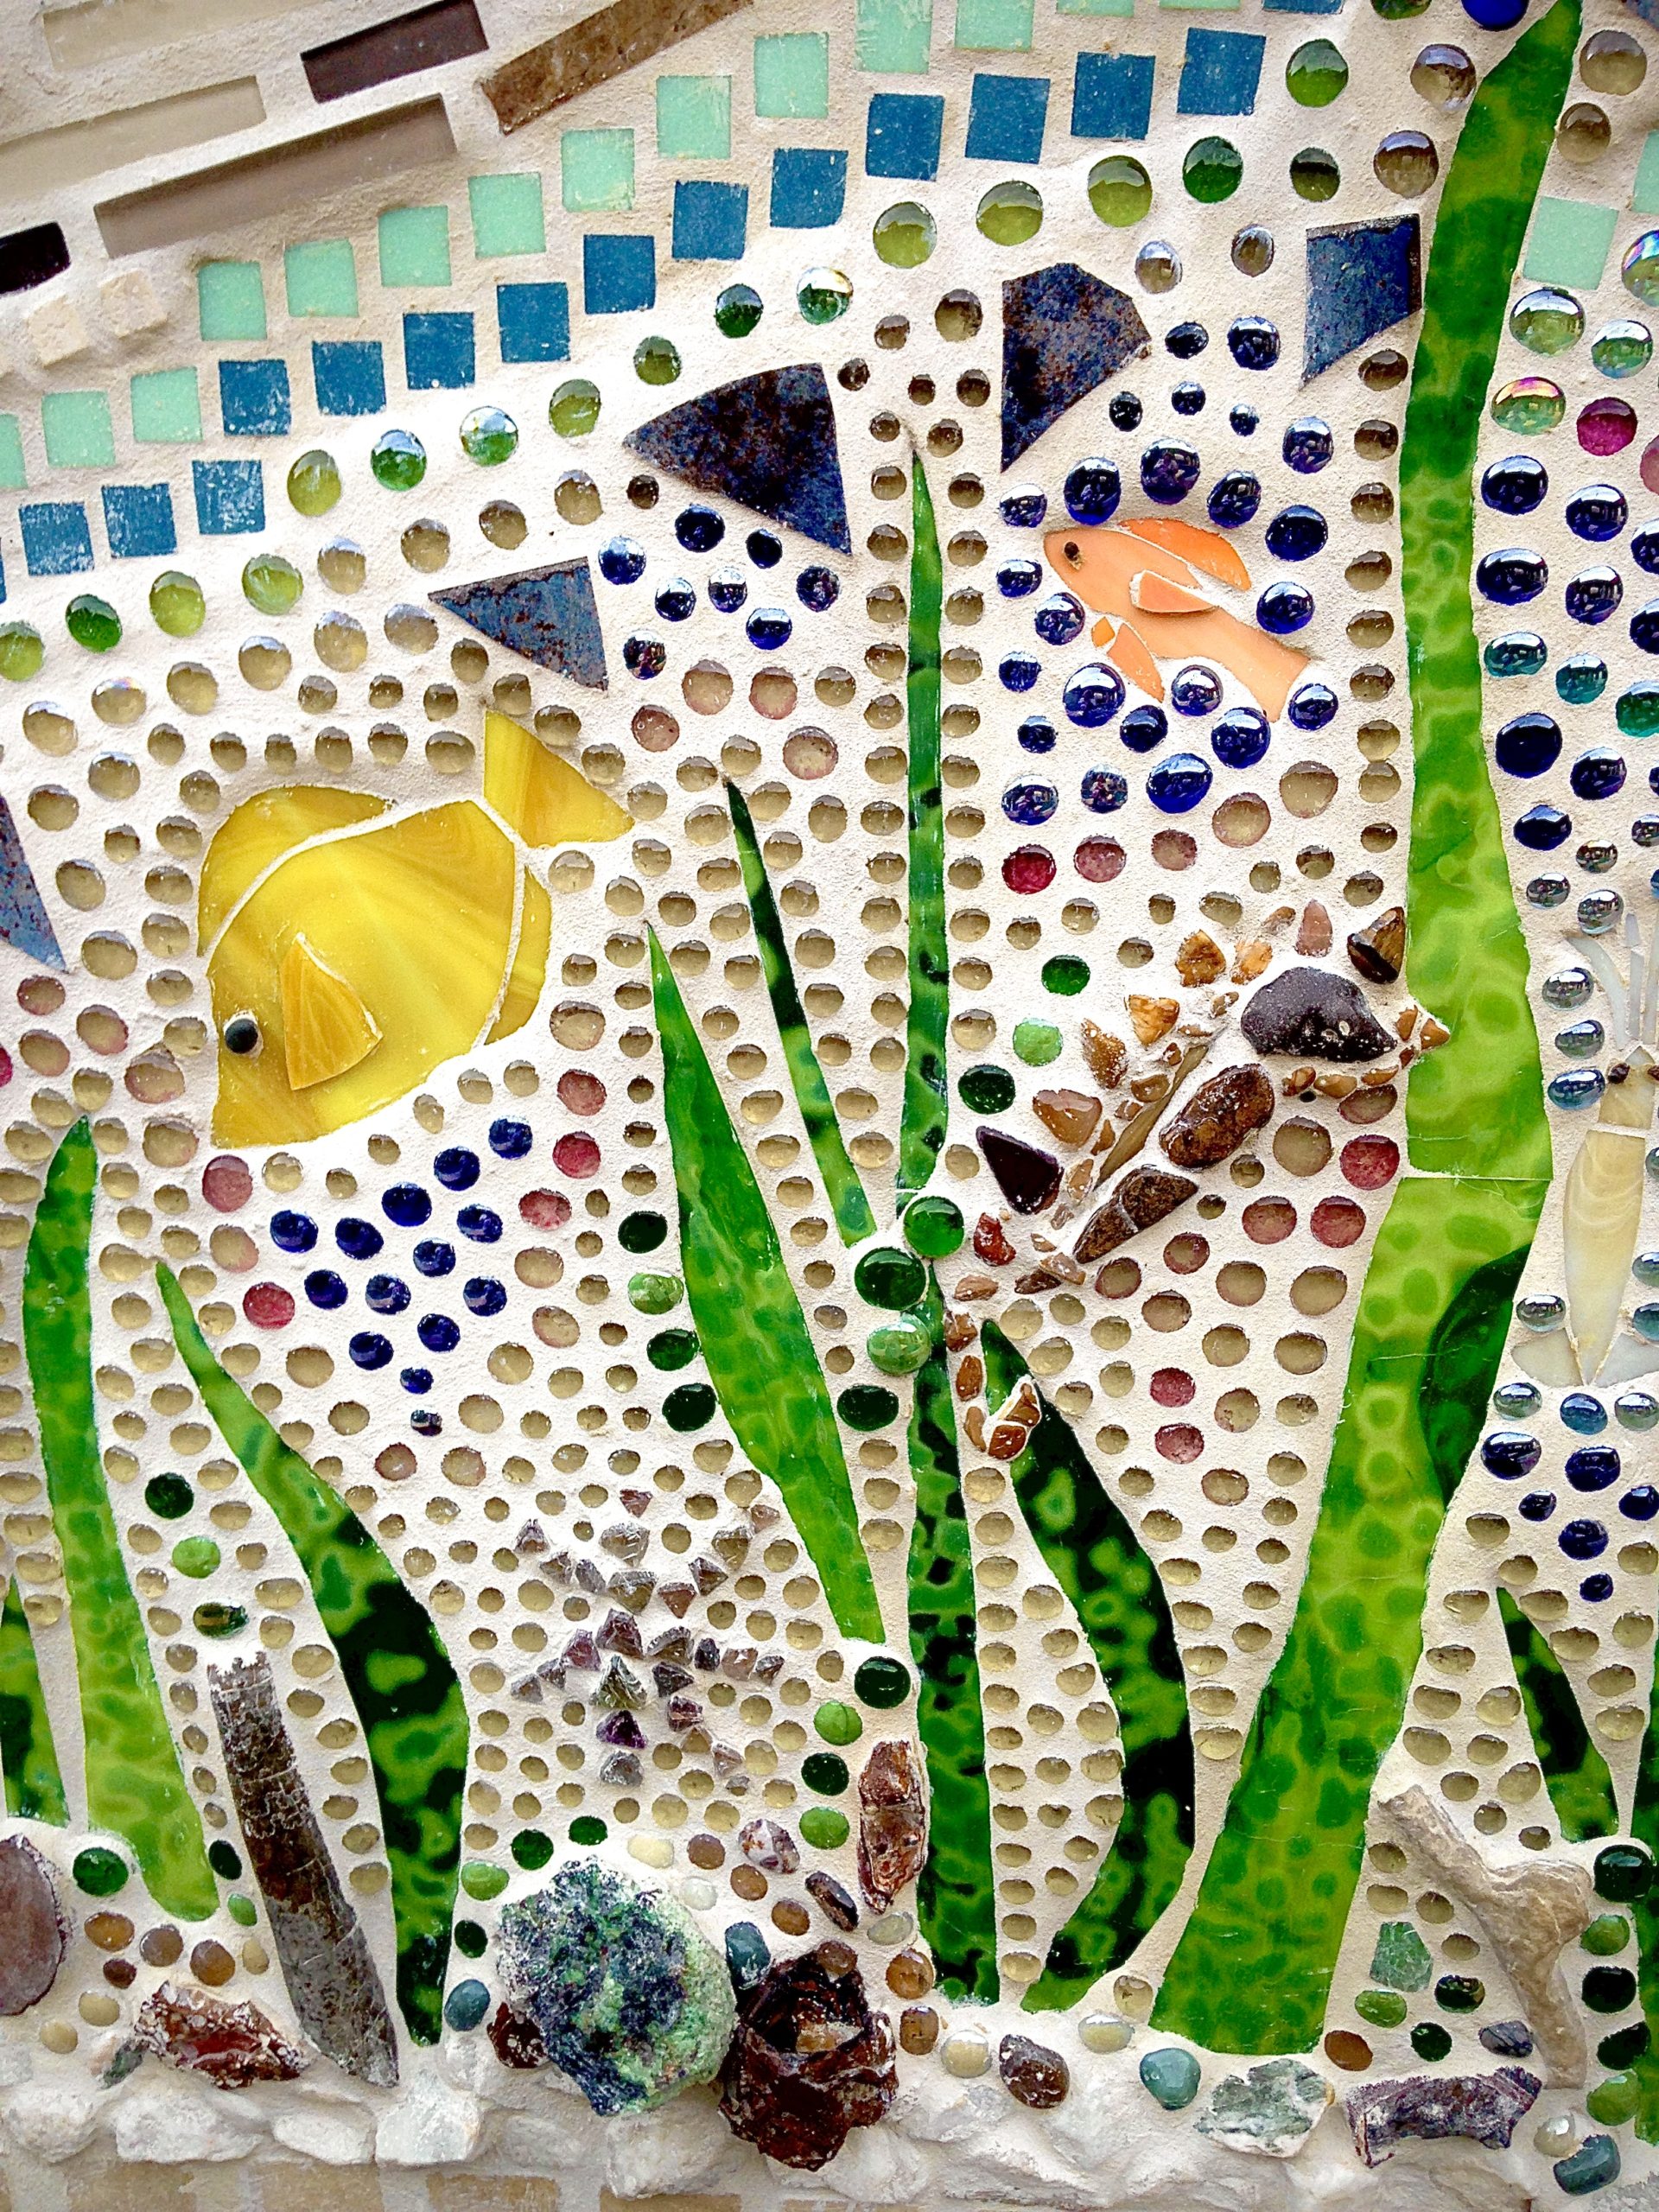
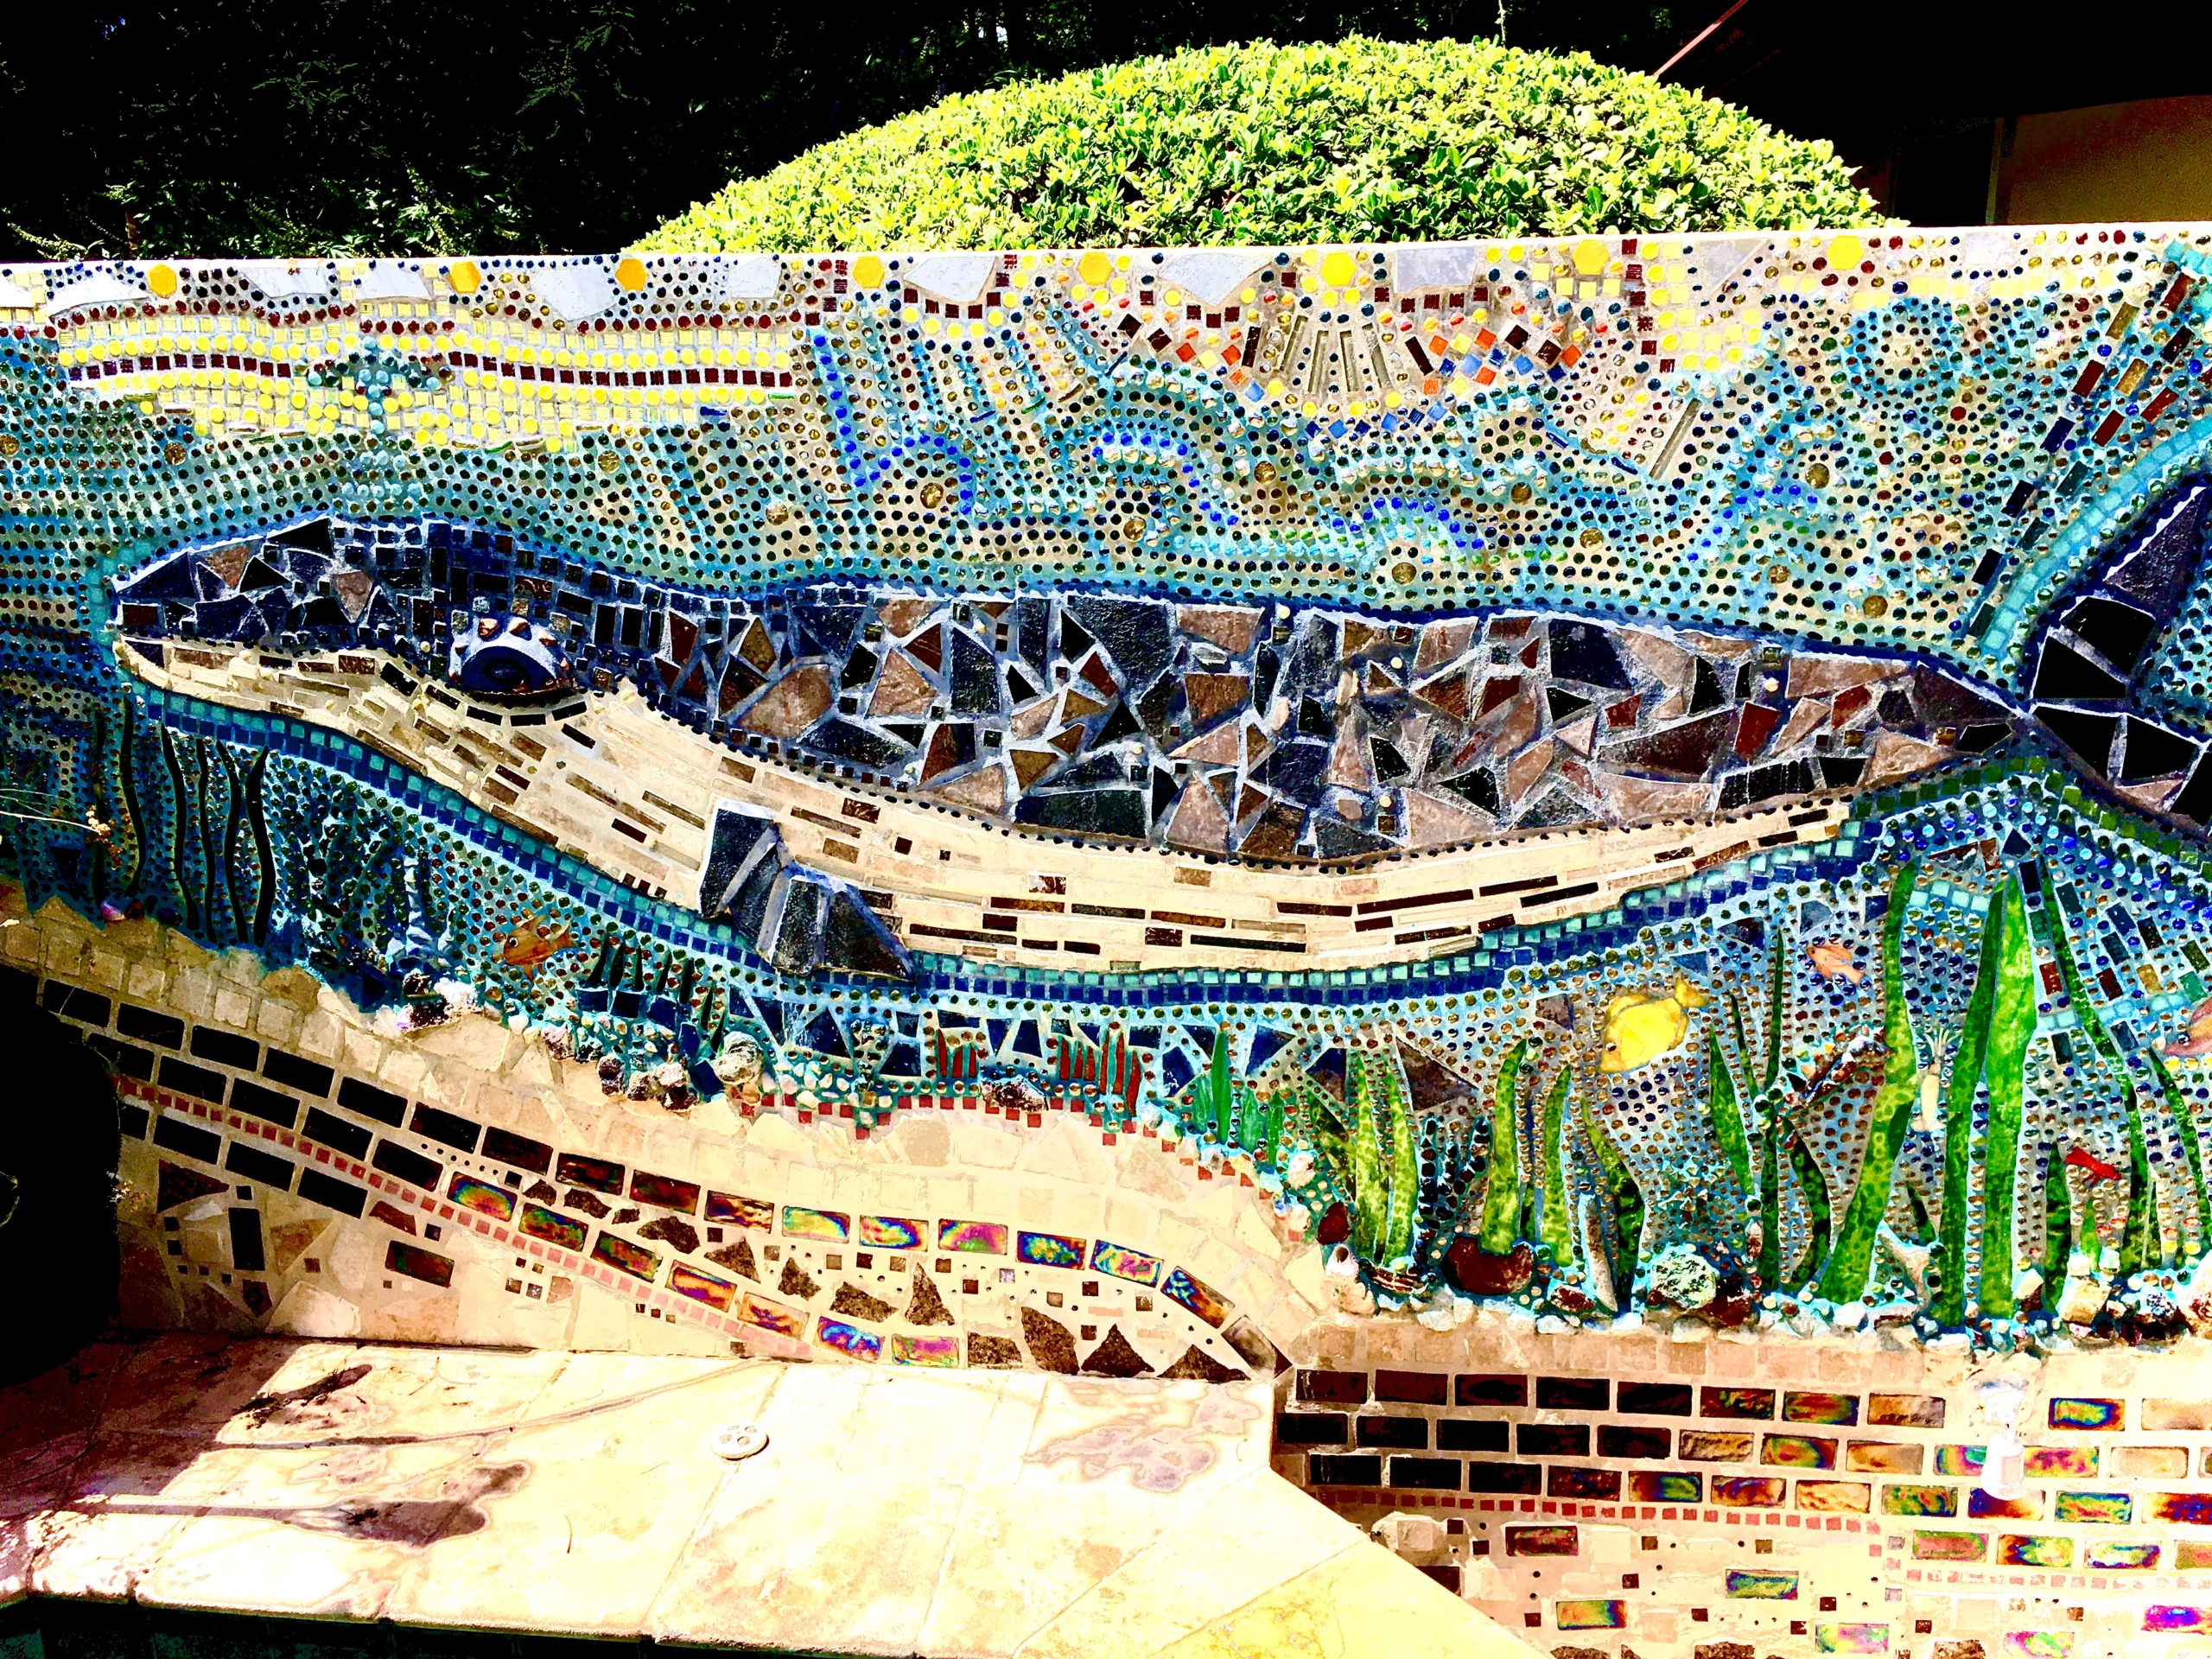
Seaweed
How lucky was I too have found the green stain glass that was colored like real plants. Cutting the long leaves was so easy and fun and looks like I put in a lot of effort. But, that is just the coloration of the glass!
To the right of the yellow fish is a seahorse made from stones, and to the right of the seahorse is a white shrimp.
At the bottom of the picture are coral fossils from the cretaceous period.
Also, there are many types of rough rocks that have not been polished. All giving the appearance of a natural sea floor.
(Swipe for more…)
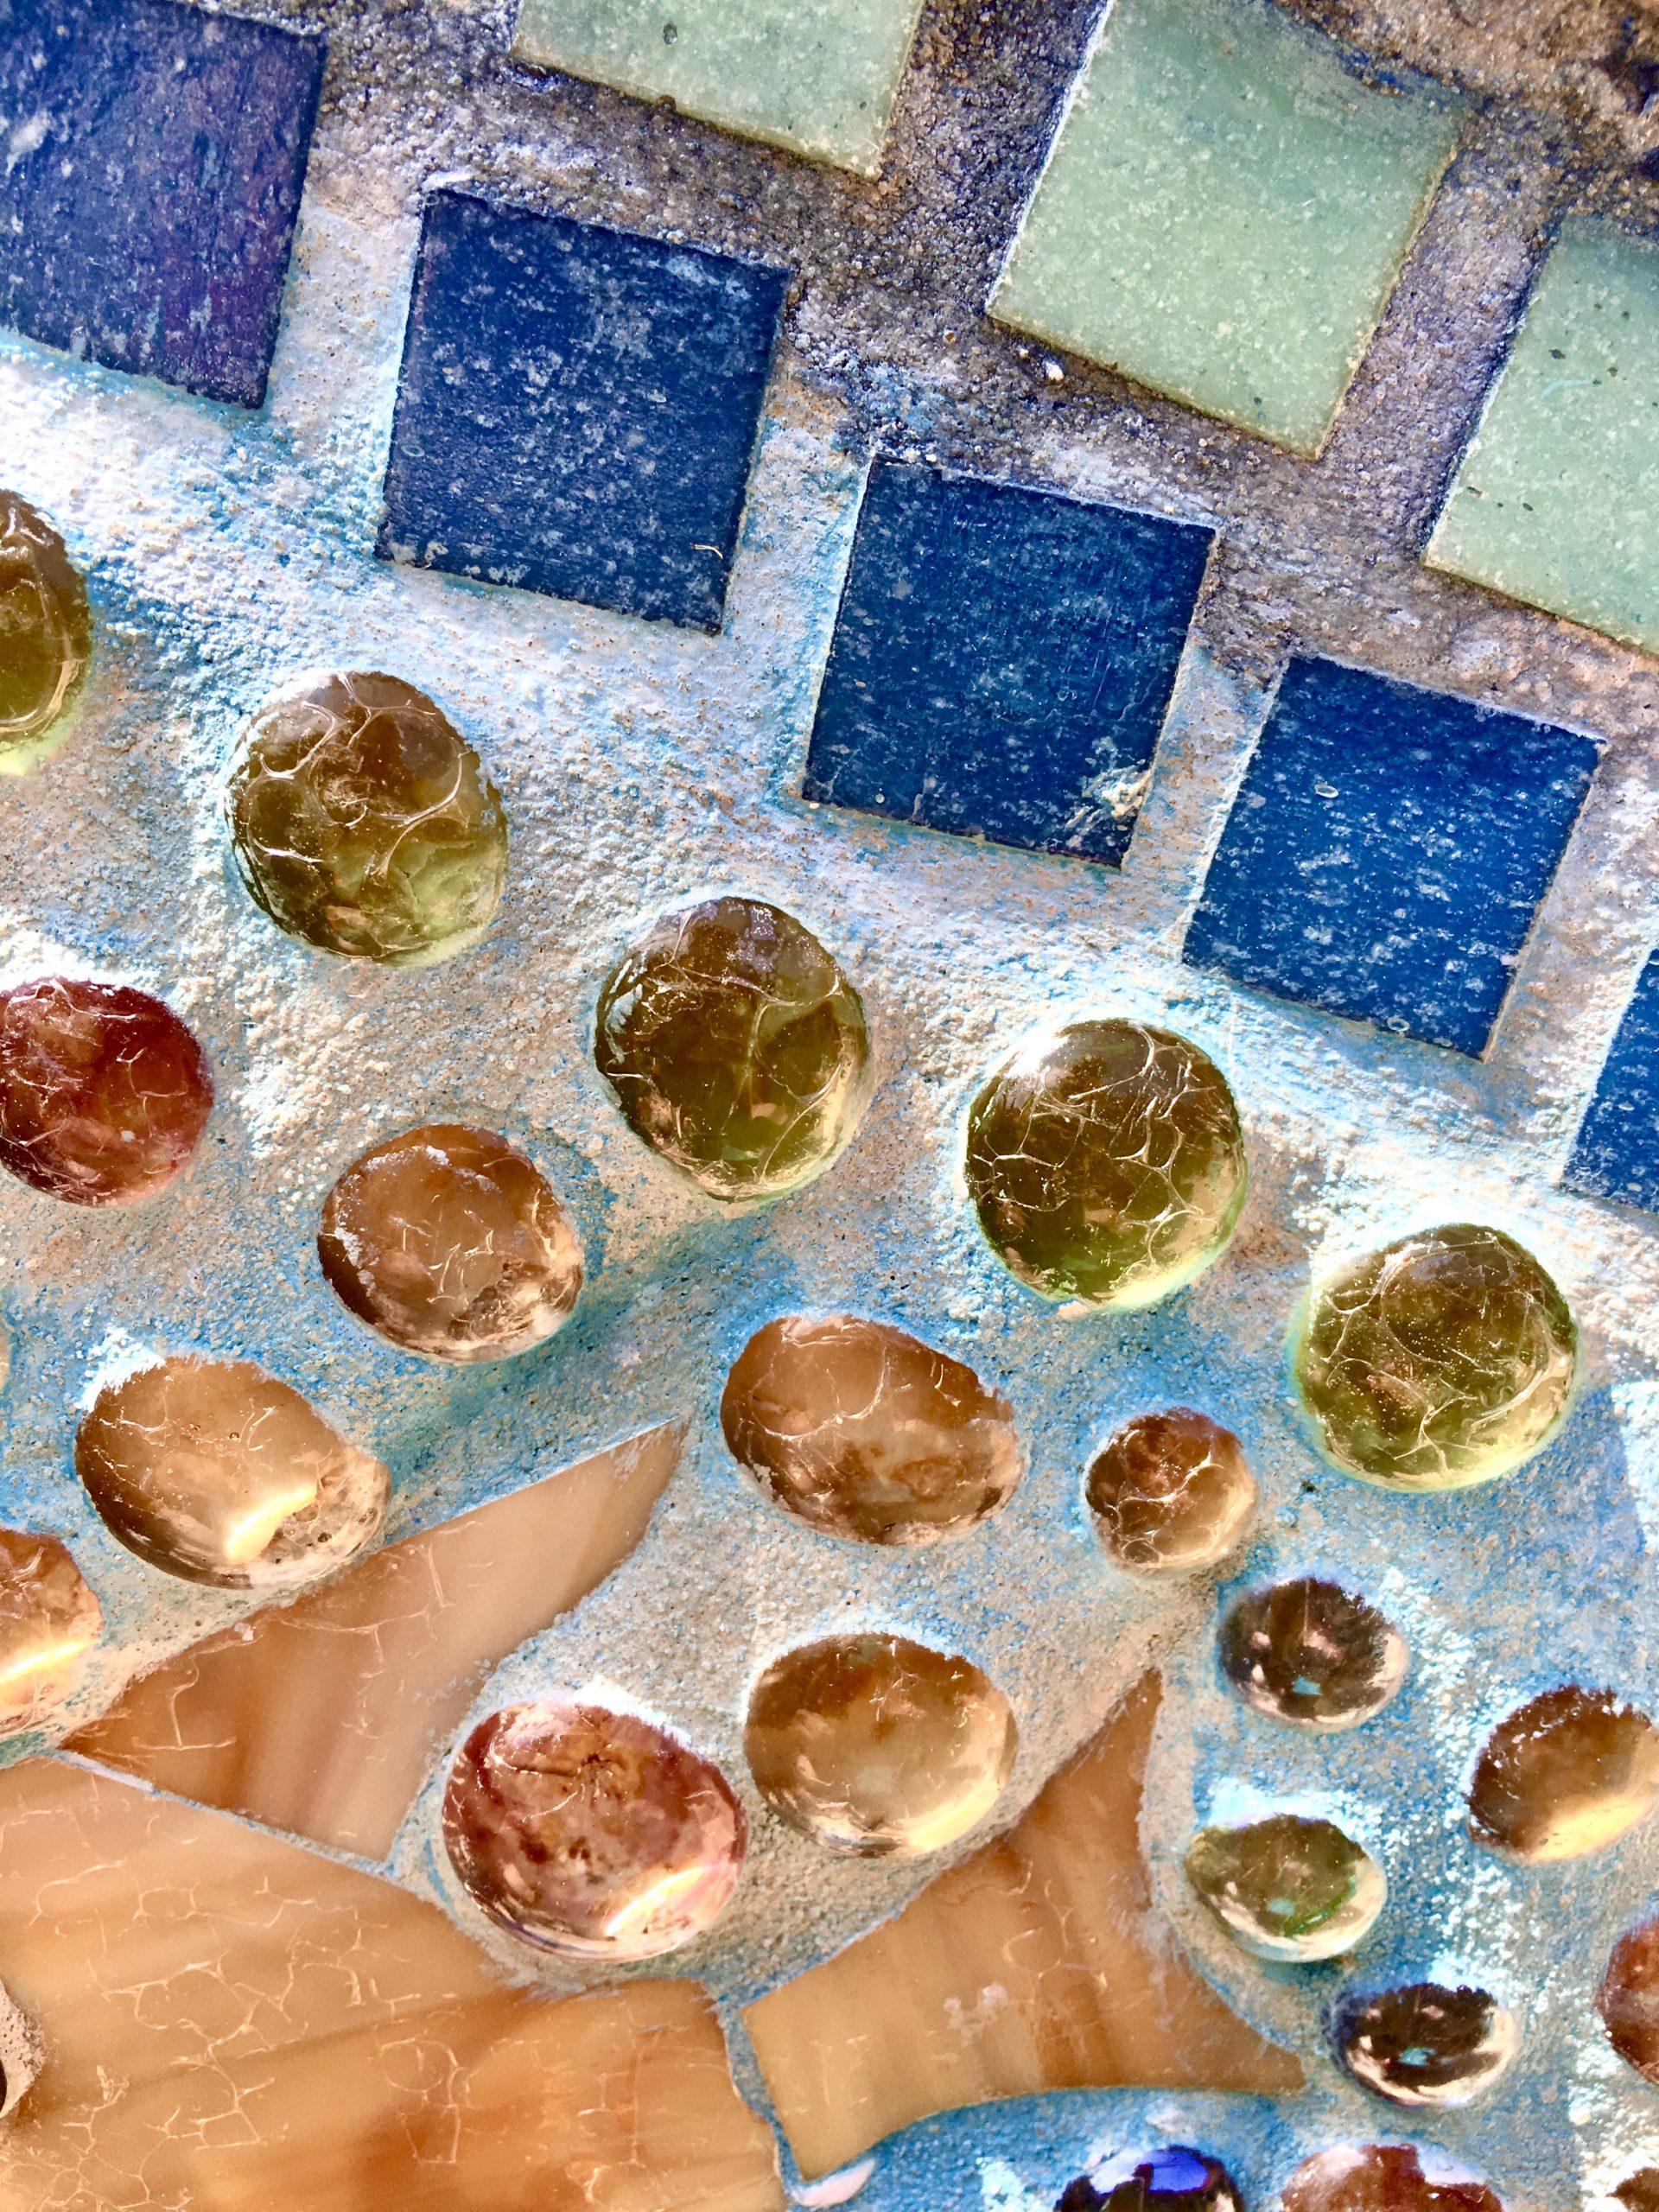
Orange Stones
These orange stones are called dome cabochons and they are made of glass. Cabochons come in many colors. They are great to fill in a background and bring sparkle or shine to any picture. When buying cabochons you have to check to make sure they are made of colored glass. Some companies paint the color on them or put paper behind the flat backs. If your mosaic is not going outside and if you are not going to fill in with any grout, you can use this type. Grout rubs off any paint. Also, some adhesives melt paper. you will then have only clear stones when you are finished.
The square stones on this wall are reversed because there are many small groves on the top part of the tile. Grout fills in these grooves and they have to be cleaned with a sharp pointed object. It is tedious, hard, time consuming work cleaning grout out of these grooves. But, it also, is a big chore pulling tile off its backing and cleaning it. I cut or pull all tile off the backing it comes on, even if I am not going to flip the tile and use the back side. A lot of mosaic work is not fun and just prep time!
When I first started doing mosaics there were all colors of grout available. Today, I use acrylic paint to color my grout. I mix in the acrylic paint as I am mixing the grout with water. In this sea wall I was just beginning to learn how to do this and some of the color has faded through the years. Inside walls do not loose their color.
(Swipe for more…)
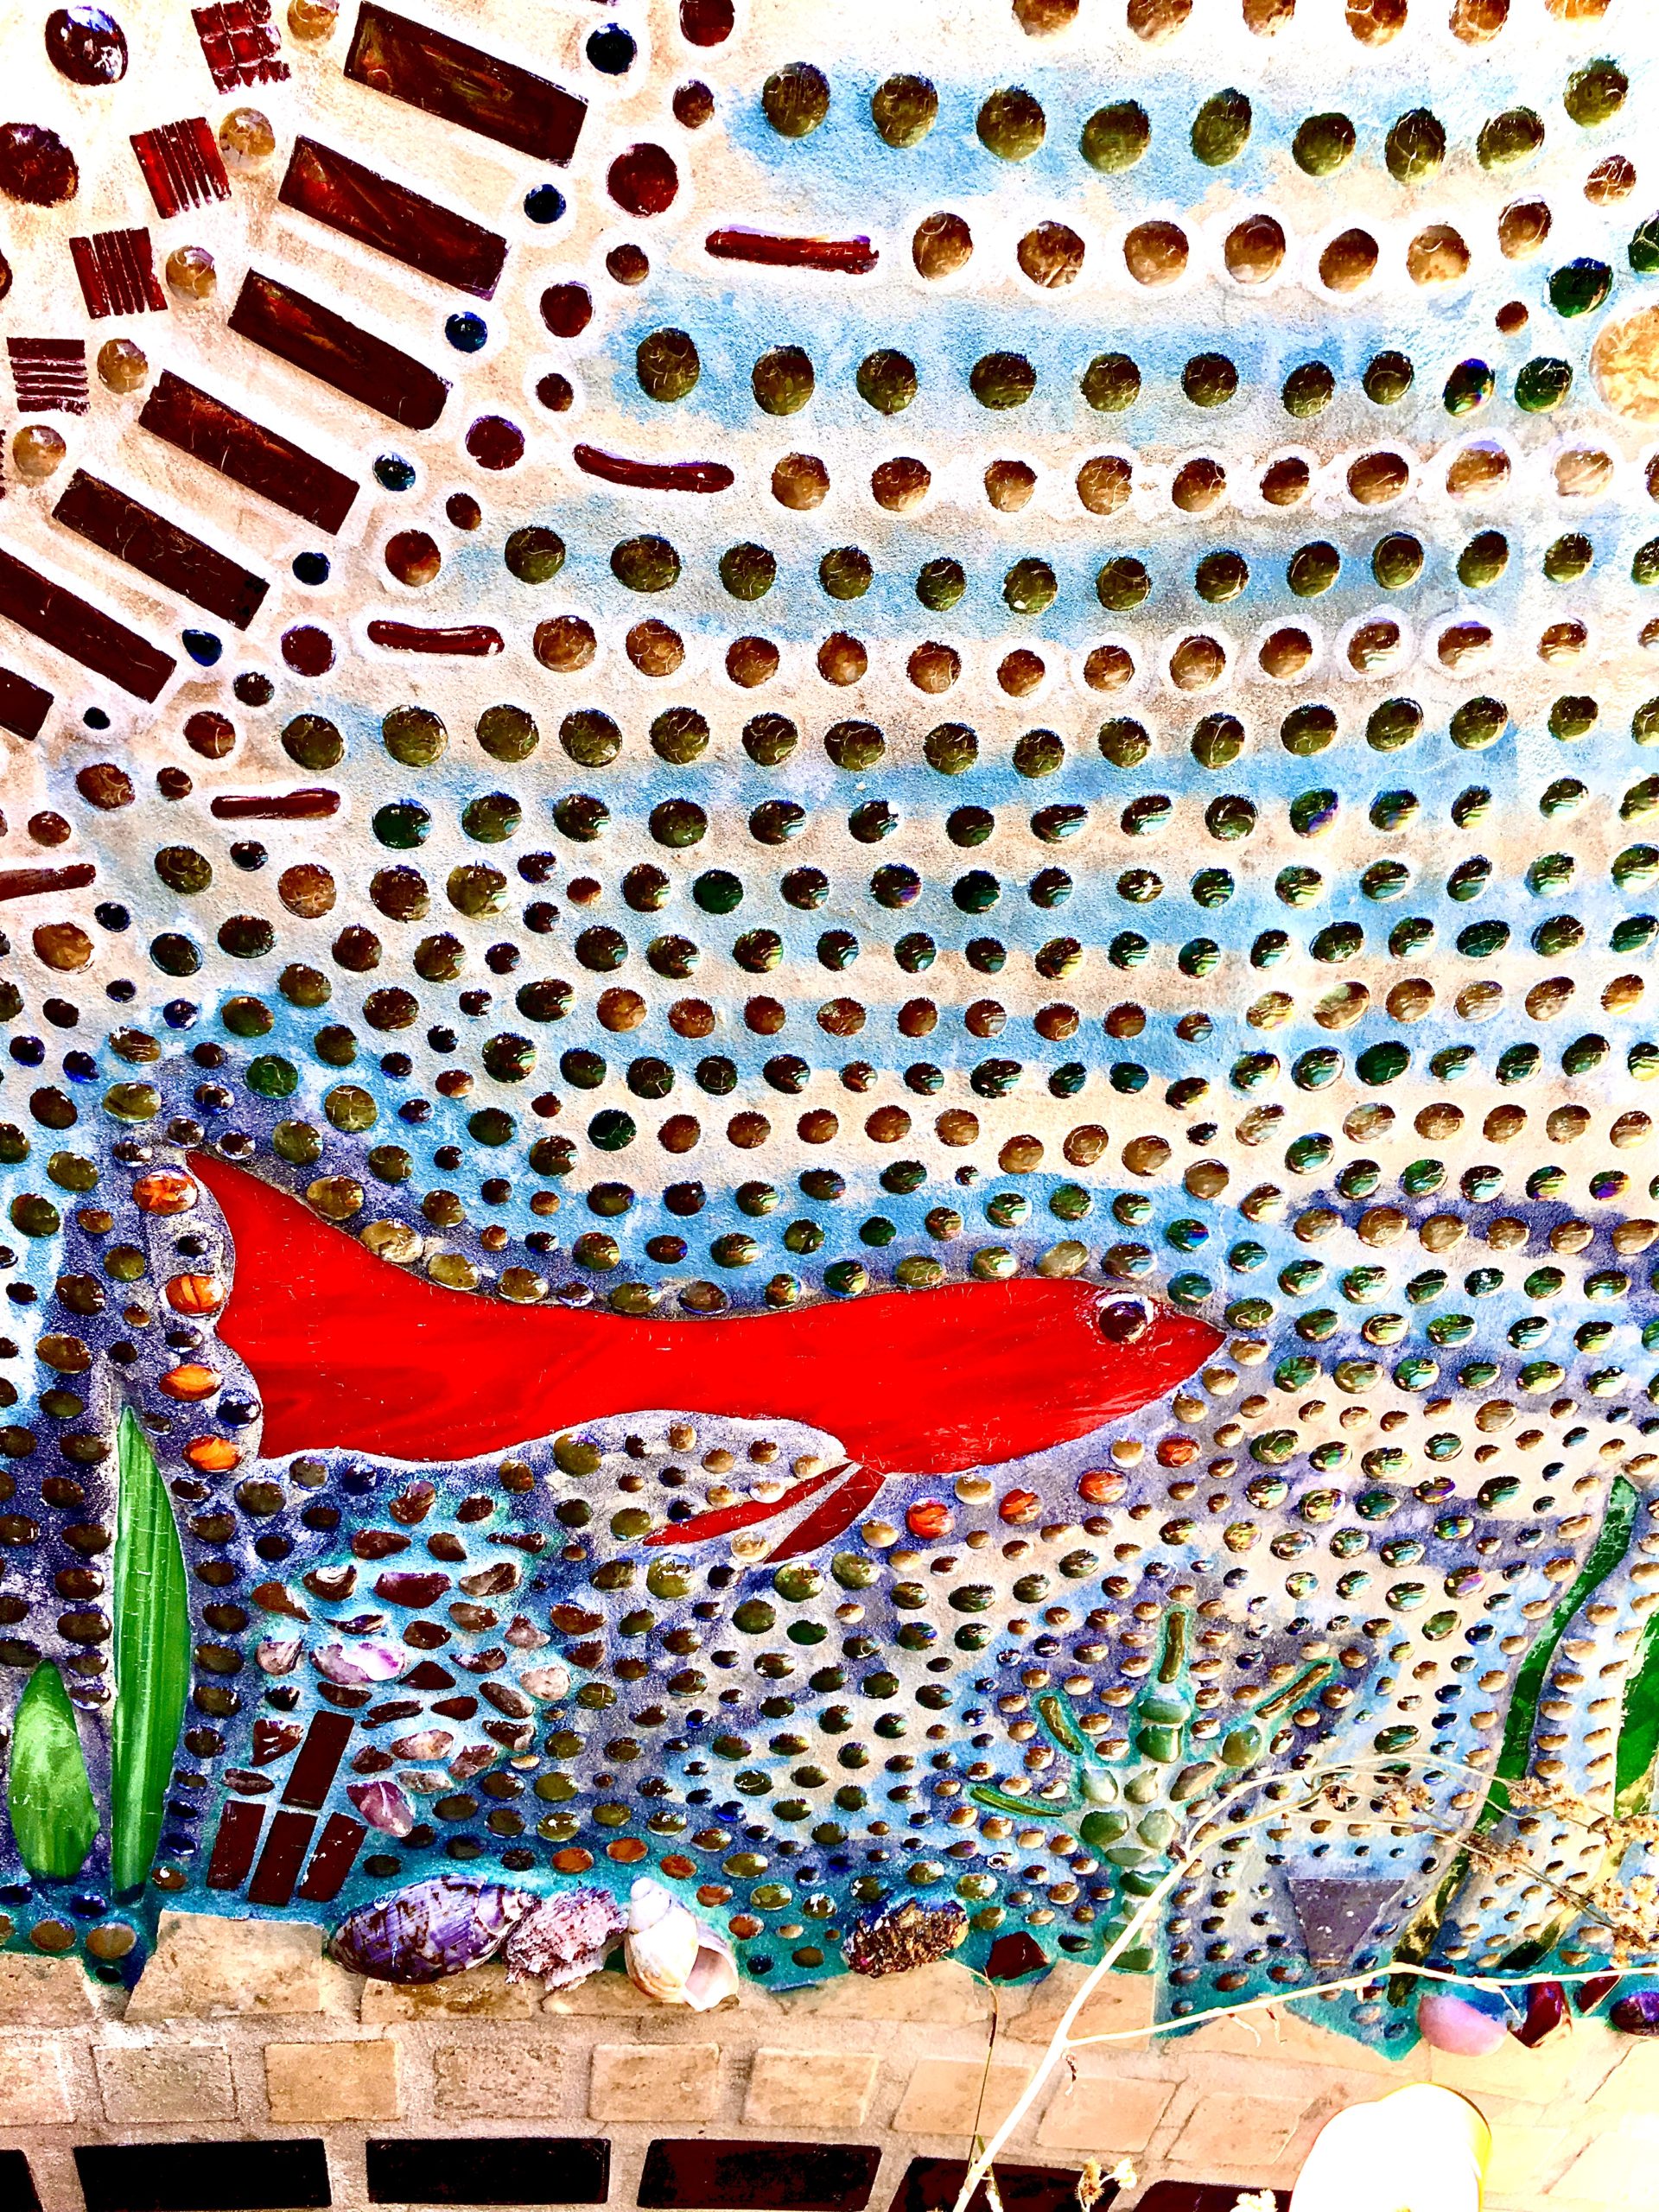
Red Fish
Creating a realistic fish is a whole different mosaic technique. Using tiny, very tiny pieces of tile or glass you can actually put any picture under a mosaic flexible screen and apply your glass with adhesive onto the screen. This system is like a paint by numbers color system because you will choose glass that is the color of the picture. So, you are actually copying the picture exactly, if you can find the right colors needed to copy exactly like the underneath picture.
I have never worked with mosaics this way. In cutting stain glass for my fish, I needed the shape to be simple. I was afraid some people would not like the simplicity of the fish and maybe even label it child like, but in art you don’t worry about anything. Art is produced to have many different opinions. Opinions are what make art – art!
(Swipe to see more…)
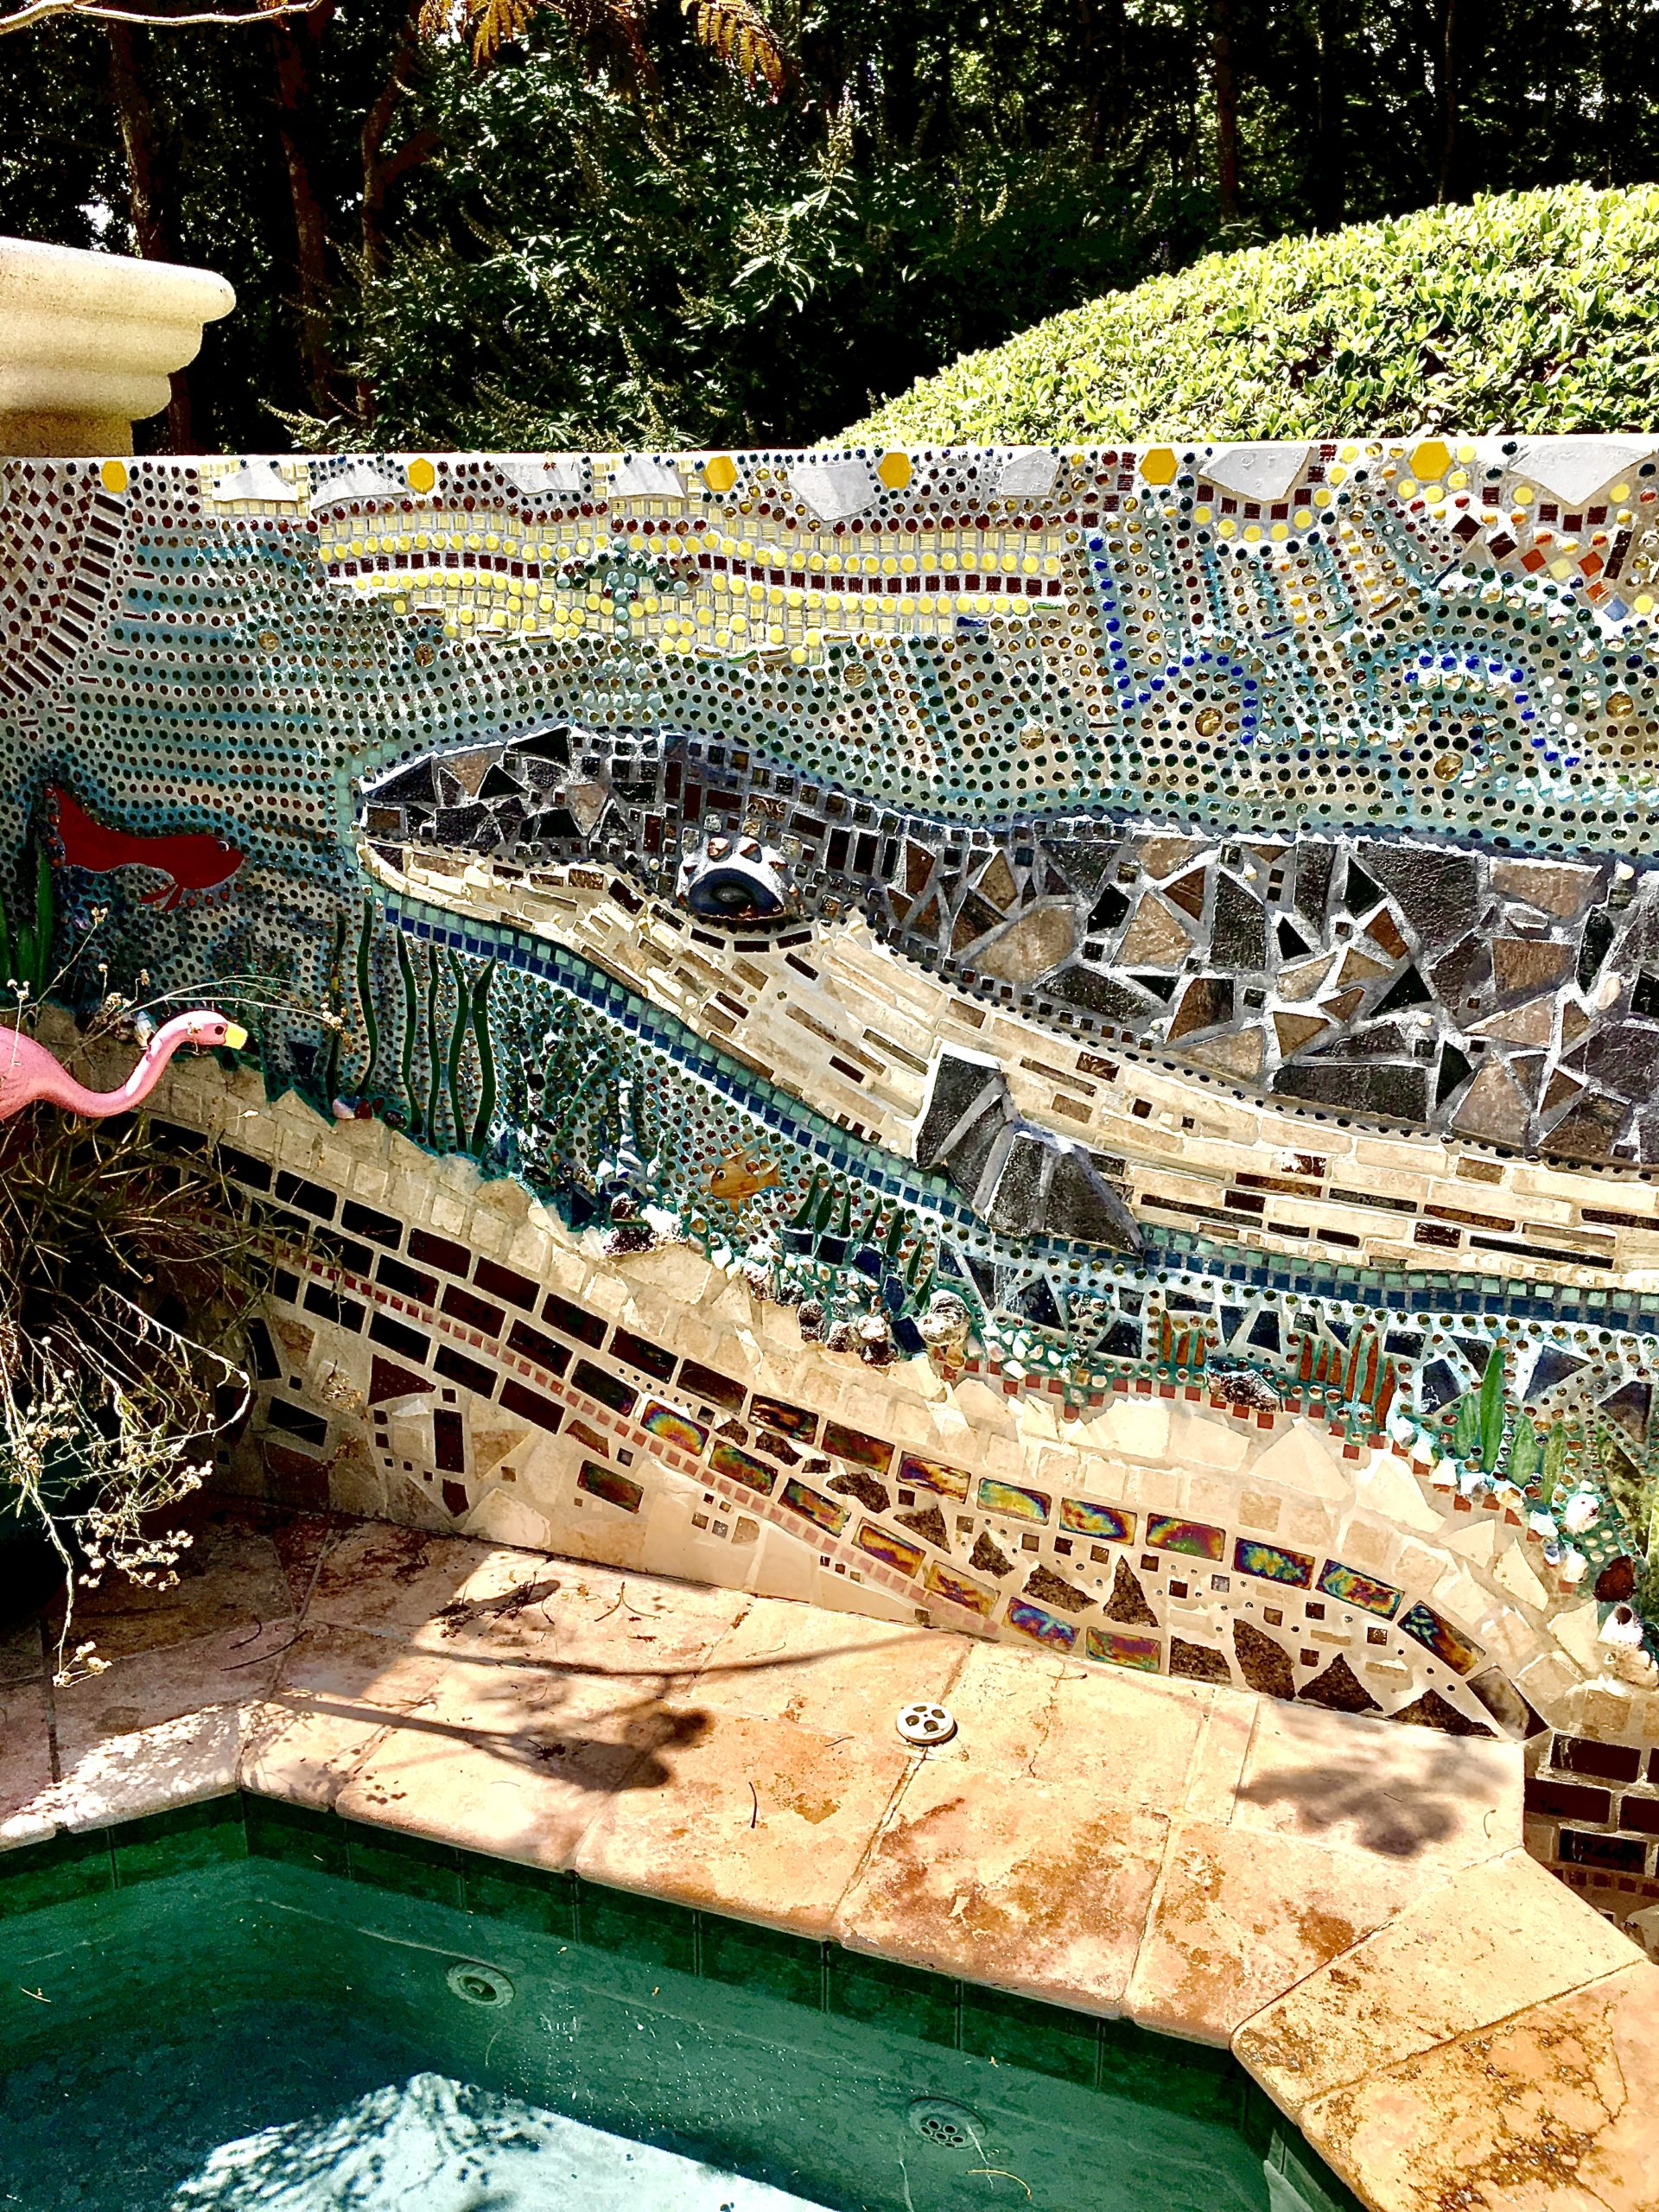

The Whale
The whale is where I started on the wall. I put two tables together and made him by adjusting the pieces to try and determine his size and shape. I break all of my tile pieces with a hammer and just go with what I’m given. It is like working a puzzle. After placing the big broken pieces of tile and I have his basic shape, I then break tile into smaller pieces to fill in the smaller spaces.
There are clippers you can use for both glass and tile to take off small pieces or edges if needed to make a piece fit. Rarely do I use clippers because instead I look for different types of tile to fill in with. This to me gives more variety and interest. Clipping, I have found, would enable me to use the same tile everywhere, and I like variety, so instead of clipping I look for something different like a stone that looks like a barnacle on his skin.
After creating the whale on the table I then took a picture so as I picked up the pieces I had a reference as to where to place the piece on the wall. Taking a picture also allows you to stop and come back to your project later. And occasionally, you might have a piece go missing, with a picture a lot if time can be saved trying to figure out, what if any pieces are missing. Swipe left to see the next image.
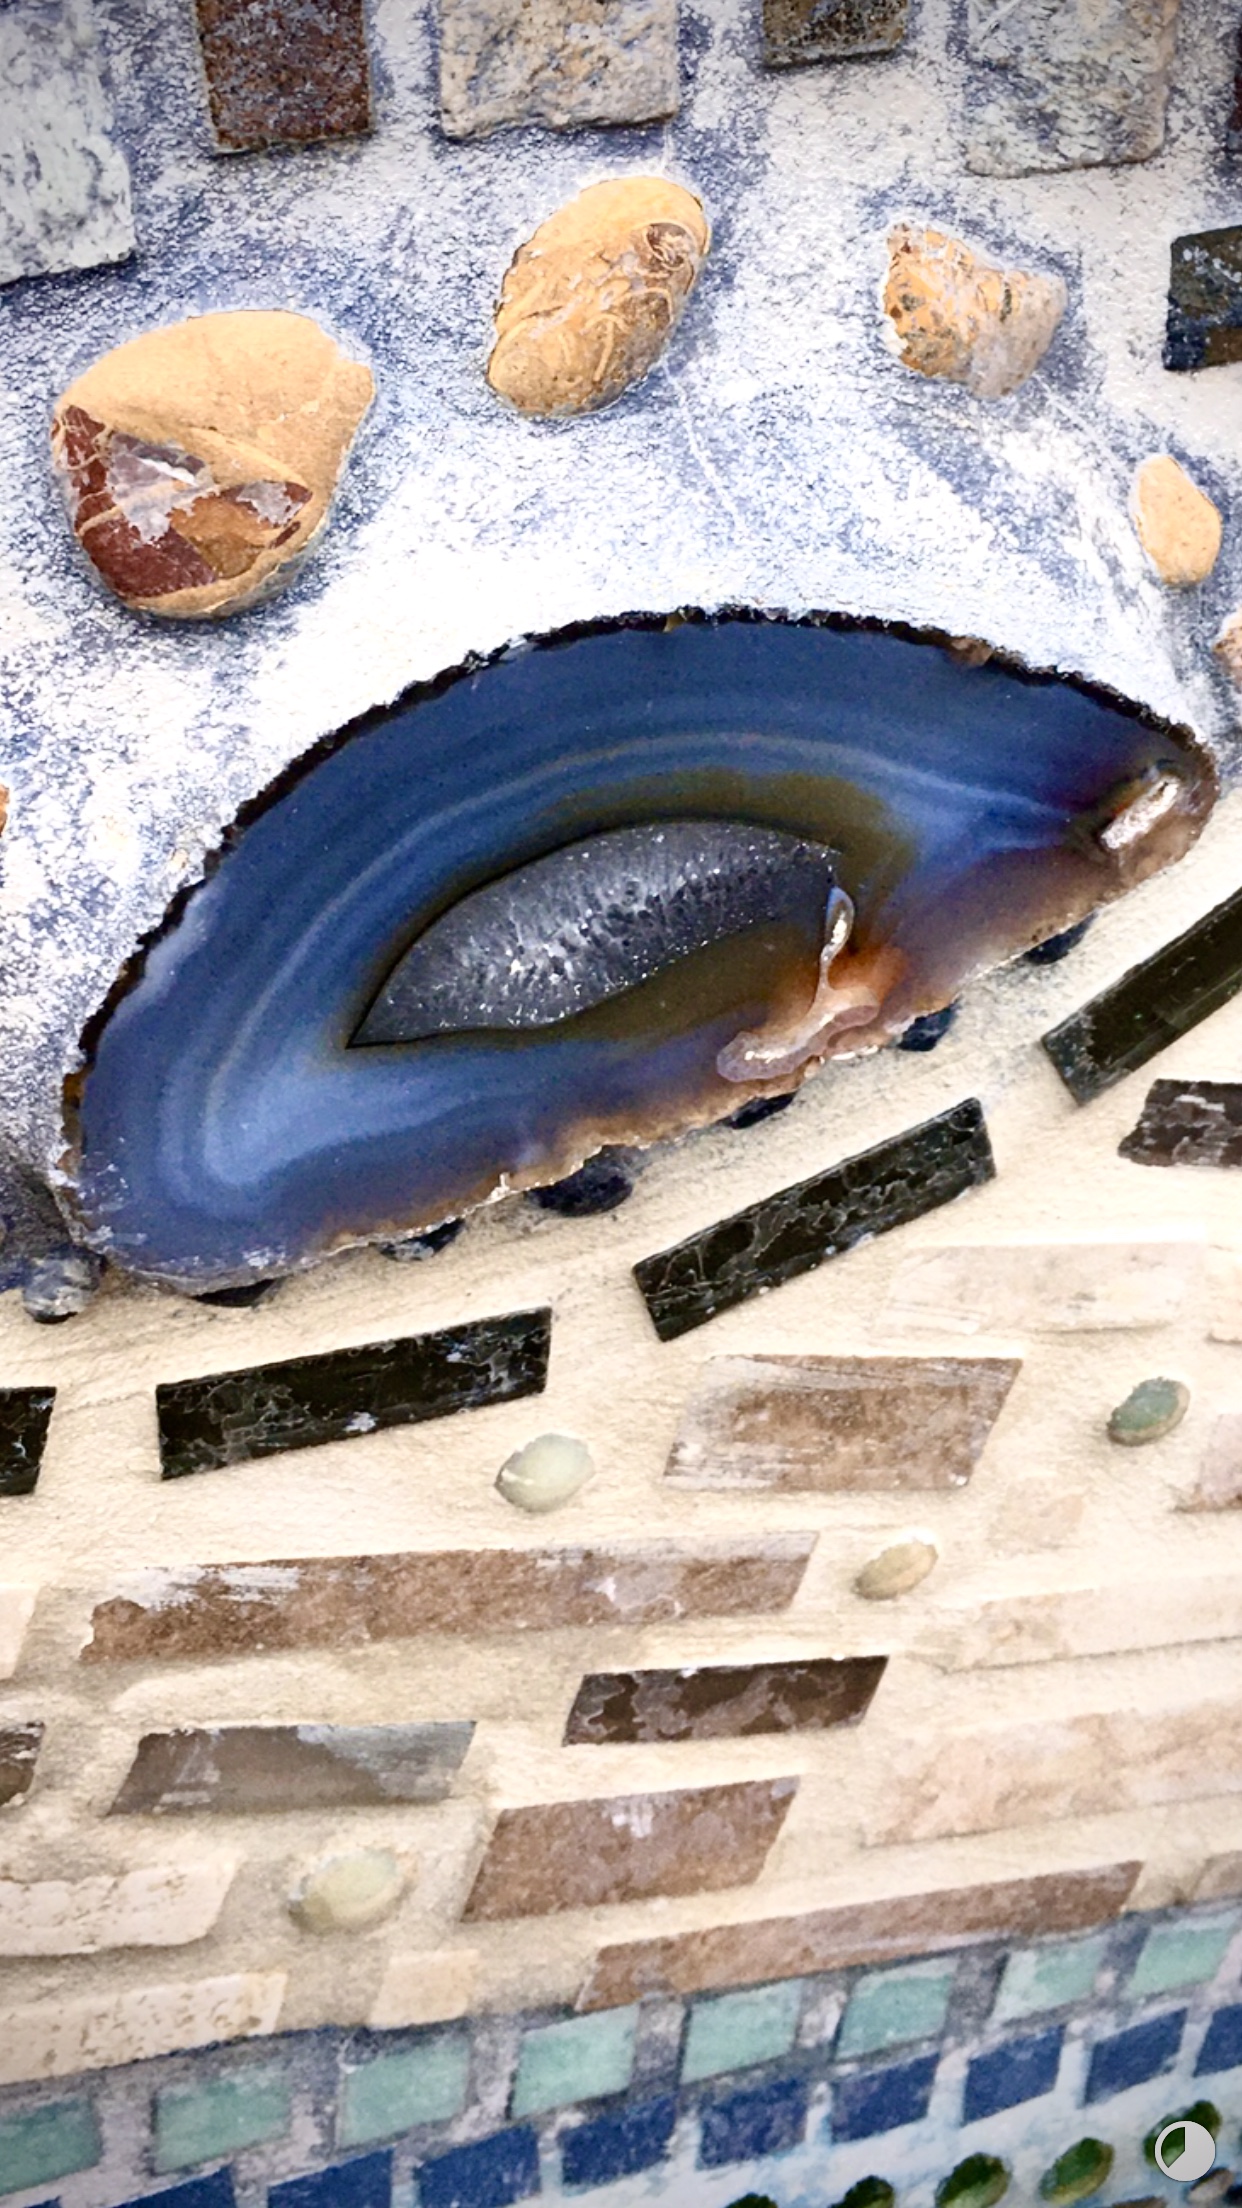
The Geode
The second wall had not really been discussed by anyone. Yet, the idea was forming in my mind from all the fossils and stones I had been collecting. It wasn’t until, I saw this sliced geode on E-bay that I knew, how I was going to create the second wall. As soon as I viewed this rock, I saw a whale’s eye!
Now keep in mind, what you vison as your art piece, others may not see. If this happens you must not let your faith or vision waiver. Go with your gut instinct! Art can not mess up! Without mistakes and interpretations we would not have art! Be prepared for others to not understand on anything until the end.
Also, know this is my least liked picture of the sea wall on Instagram! But, if I had not seen this rock as a whale’s eye, I would not have had a picture. This rock was my motivating factor for the whole wall! Swipe right to view the previous pictures.